Setting up Scalr & Azure DevOps Part 3 - Execute Your Terraform Code and Create a Workspace
Execute your TF code and create a workspace, both using PR automation, and by plugging the CLI into Azure DevOps.

- This third post in a Scalr and Azure DevOps series walks through creating a workspace and executing Terraform code, both via VCS-driven PR automation and by plugging the Terraform CLI into Azure DevOps.
- When creating a VCS-integrated workspace, Scalr auto-detects required variables, supports custom hooks like terraform fmt --check before or after plan and apply, and can trigger dry runs on pull requests.
- A Scalr run progresses through Plan, Cost Estimate, Policy Check (against OPA policies), and Apply stages, skipping stages when no resources have cost or no policies are defined.
- For a CLI-driven workspace using Scalr as a remote backend, the Azure DevOps pipeline generates a terraformrc file with an API token, which must be a user or team token, not an organization token.
- The remote backend does not accept -var or -var-file CLI options; Scalr run-scope variables are defined in the workspace or via the API and provider instead.
This was written by Jack Roper, a guest blogger.
Getting started with Scalr and Azure DevOps takes three stages. This series walks through each one step by step.
This is the third and final post, and it covers how to execute your Terraform code and create a workspace, both using PR automation and by plugging the CLI into Azure DevOps. There is also a third way to create a workspace, through the module registry, but that one still relies on the VCS connection.
If you missed the first post in the series, check it out here: picking a workflow.
And the second post here: how to add Azure credentials and link them to an environment.
How Do You Execute Your Terraform Code and Create a Workspace?
What Does the Existing Scalr Environment Look Like?
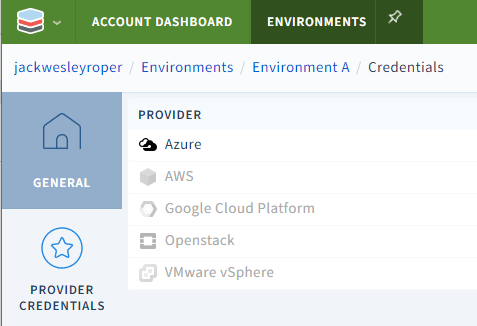
In the first 2 posts, we linked our Azure DevOps instance and our Azure subscription to our Scalr environment. Here's the current environment setup.
Selecting provider credentials will display our linked Azure account.
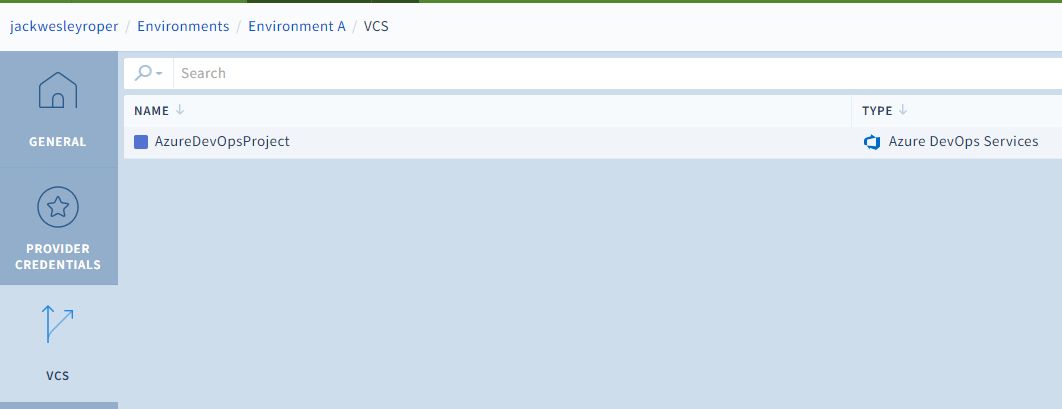
Selecting 'VCS' we see that our Azure DevOps project is linked.
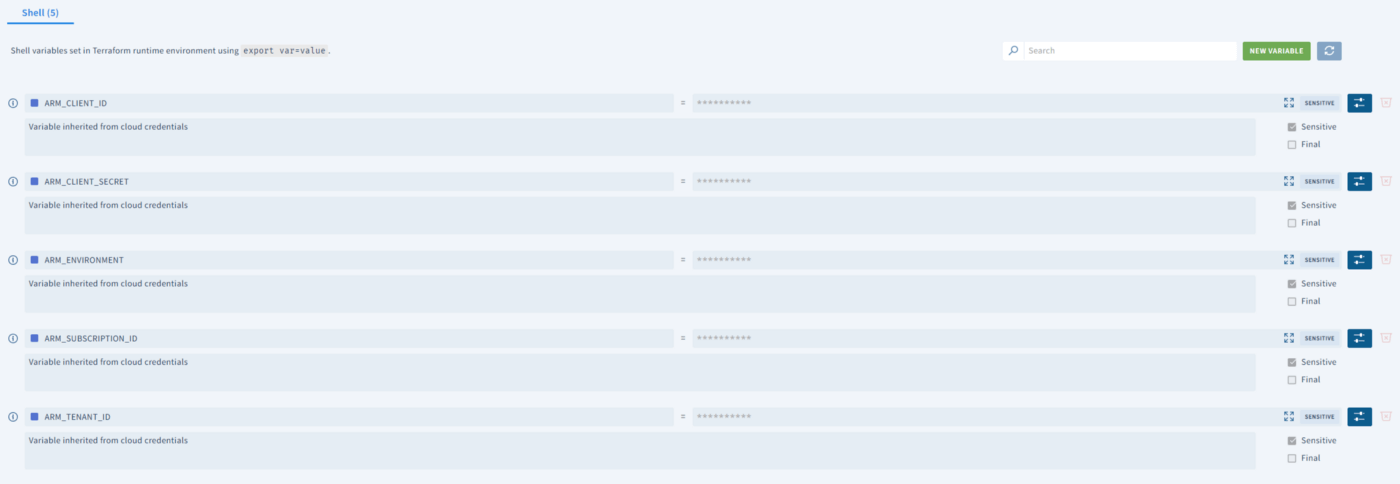
Selecting variables will display the variables inherited from cloud credentials that were set up earlier.
Where Can You Find the Sample Terraform Code?
The Terraform code contained on my Github page contains configuration files to add some groups to Azure Active Directory. You can download it here if you want to follow along! Feel free to follow me on GitHub!
https://github.com/jackwesleyroper
How Do You Create a VCS-Integrated Workspace?
Next up is creating a workspace. A workspace is where all the objects tied to your Terraform-managed resources live.
- Within the environment, select the 'create workspace' button.
- We will be creating a workspace linked to our Azure DevOps VCS provider. Select it from the drop-down list, choose the appropriate repo the code is held in and the branch. Here you can specify the Terraform version, and auto-apply changes when a terraform plan run is successful if desired.
Enabling VCS-driven dry runs enables Scalr to automatically kick off a dry run when it detects a pull request opened against a branch.
The Terraform directory sets where Terraform will actually run from and execute commands. It is a relative path and must be a subdirectory of the top level of the repository or of the subdirectory if specified.
Runs can also be triggered on certain subdirectories only, for this option to be enabled the working directory needs to be set.
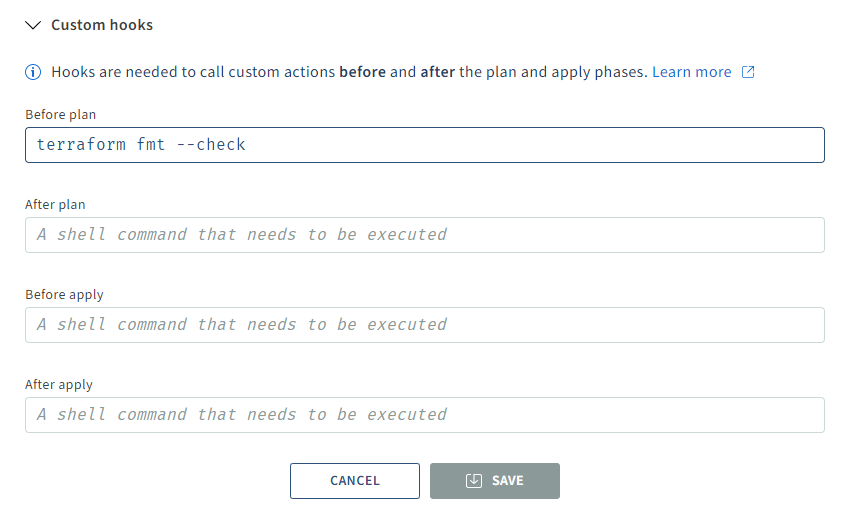
Lastly, the custom hooks option can be used to call custom actions at various stages in the Terraform workflow. These can be set before or after the plan stage, or before or after the apply stage.
For example, a custom script or API call can be executed after the apply phase, or the terraform validate command could be executed before the plan phase. I'm going to add the terraform fmt --check command into my workflow here to validate that the formatting of my code is consistent. Scripts can even be downloaded here using wget or tests run using curl. Pretty cool!
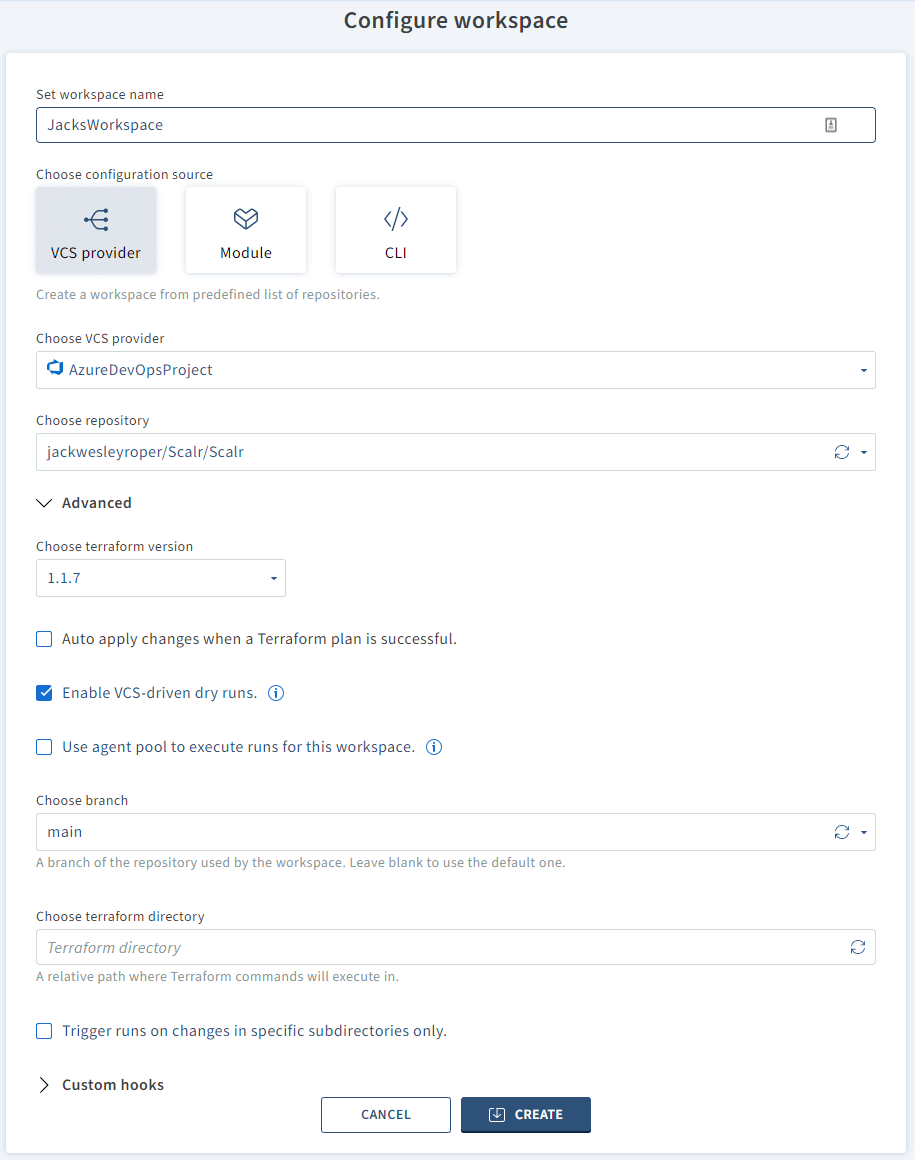
- Press create once all the options are filled out.
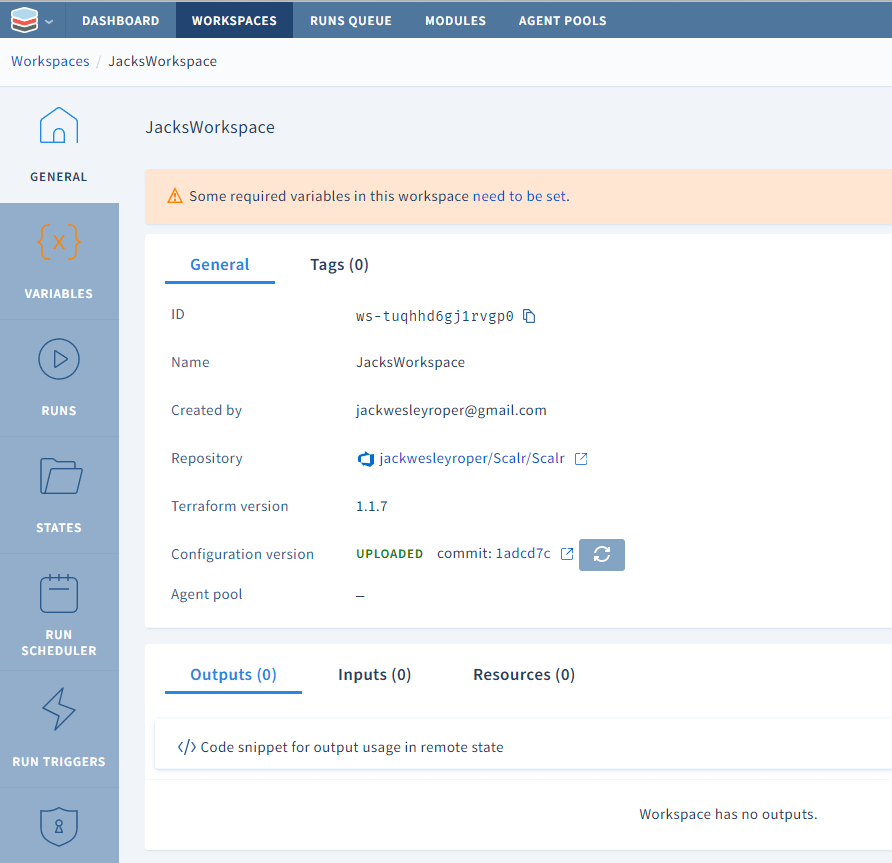
Notice that we will now need to set some variables. Scalr detects which variables in the Terraform code are required to be set (those that do not have values), and will automatically create them. Variables can be set in the Terraform code or the Scalr UI. For my example, I need to fill out the ad_group_names variable.
If the local workspace contains any *.auto.tfvars files these will provide default variable values that Terraform will automatically use. If variables in the *.auto.tfvars files have the same names as variables specified in the workspace, the predefined workspace values will be used. For map variables the values in *.auto.tfvars are merged with values in the same named variable in the workspace.

If your Terraform configuration requires the use of Shell variables these can also be added here. Note that the variables we used earlier to set up the cloud credentials for our Azure subscription are automatically inherited.
If the Terraform configuration utilizes shell variables (export var=value), e.g. for credentials or to set values for Terraform input variables with TF_VAR_{variable_name}={value} (-parallelism, -var-file, etc). Shell variables can be set at all levels in Scalr and are inherited by lower levels. Use environment or account level for shell variables that are needed in multiple workspaces or environments. Use workspace level for shell variables that are specific to individual Terraform configurations. It is also possible to use the Scalr provider to pull output from one workspace and post it as an environment or account shell variable to make it easily available to all other workspaces.
How Do You Queue a Run and Fix a Failed terraform fmt --check?
Now we have everything in place we can go ahead and run our code.
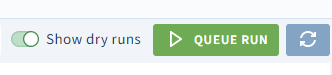
Navigate to Runs -> Queue Run, enter a reason for the run, and hit Queue run.
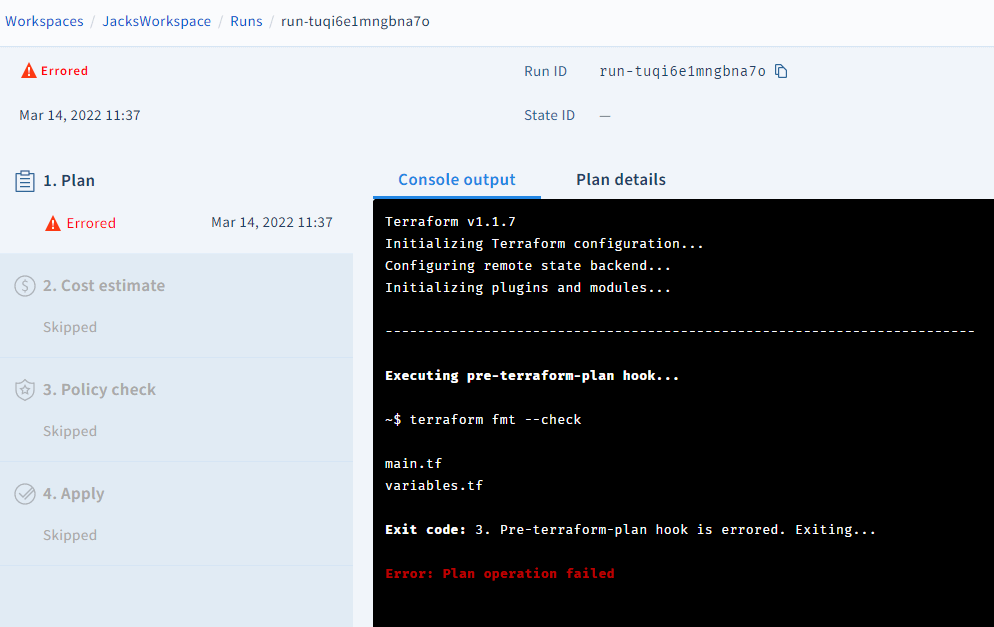
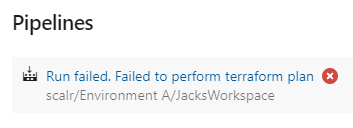
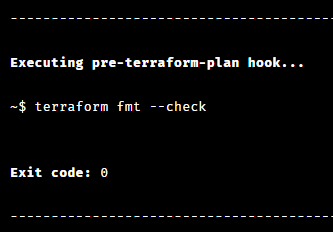
My first run errored! The custom hook that I set up earlier detected that my code was not formatted correctly and exited with error code 3. The check option I used exits with code 0 if the configuration is formatted.
-check Check if the input is formatted. Exit status will be 0 if all input is properly formatted and non-zero otherwise.
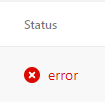
Over in Azure DevOps, I also noticed an error message on my repo:
I ran terraform fmt on my code and executed the run.
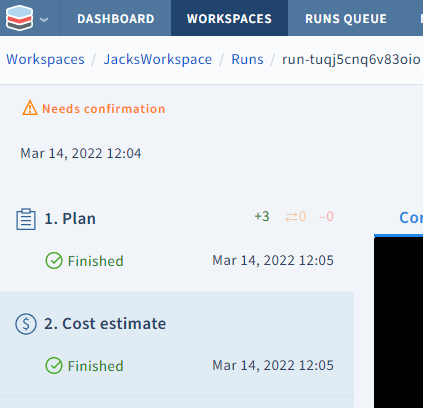
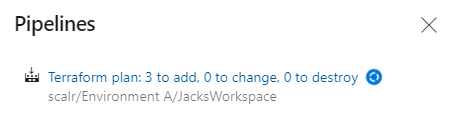
The run confirmed that my 3 groups would be created in AzureAD and that the configuration was formatted correctly. Over in Azure DevOps, I could see the plan in progress:
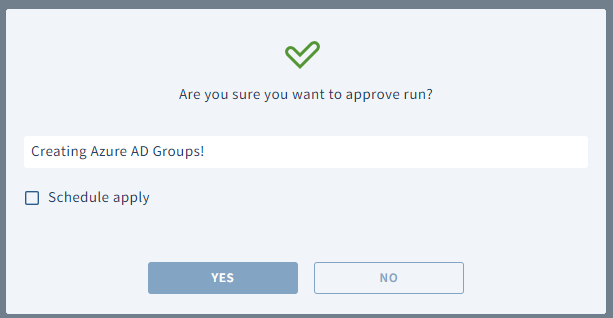
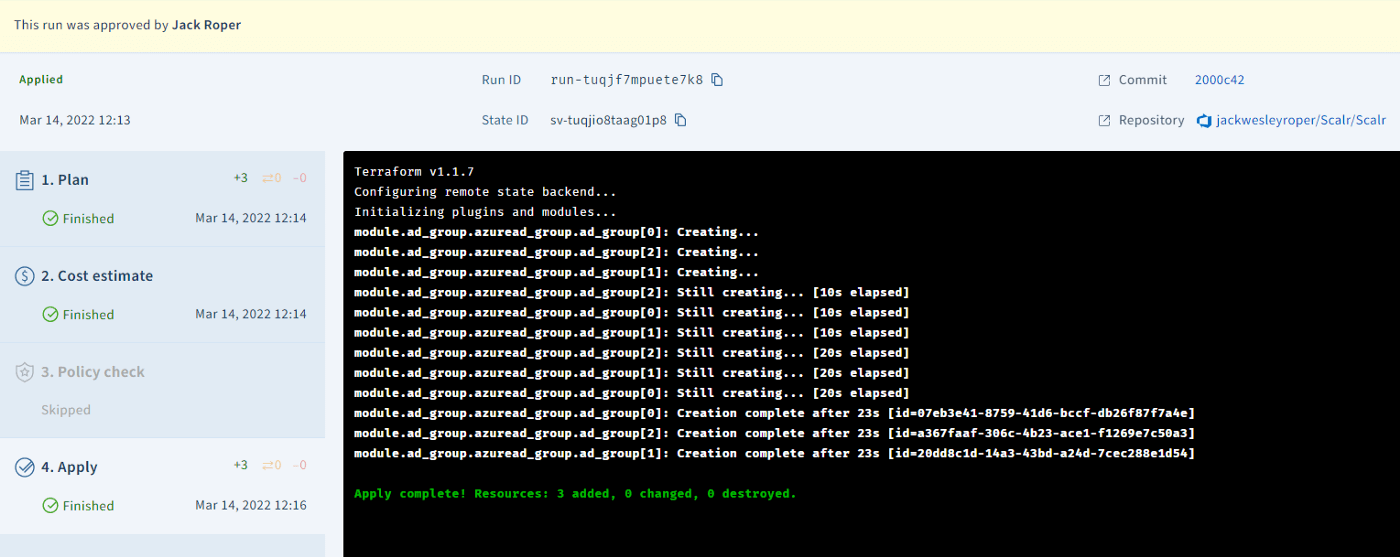
The 'needs confirmation' warning was displayed, at the bottom of the run screen I hit 'approve'

Note the repository link and commit link will take you to the appropriate location in Azure DevOps.
The workspace runs through the following stages:
Plan, which allows users to view the planned creation, update, or destruction of resource through the standard console output or detailed plan view. The detailed plan will alert users of destructive changes and makes it easier to search the plan when there are many resources affected. It is also the section to check who approved an apply and comments associated with the approval.
Cost Estimate, which will show you the estimated cost for the resources that are being created. This information can be used for writing a policy to check cost
Policy Check, which is used to check the Terraform plan JSON output against Open Policy Agent policies. This step can be used to enforce your company standards.
Apply, which will actually create, update, or destroy the resources based on the Terraform configuration file.
Note that in my example, I was creating Azure AD Groups that do not incur any cost, so Scalr simply reported that it had detected no resources. Also, I had not defined any policies, so that stage was skipped.
How Do You Create a CLI-Driven Workspace and Set TF_CLI_CONFIG_FILE in Azure DevOps?
Say you already have a workflow set up in Azure DevOps that uses the Terraform CLI, and you want to point it at Scalr. Scalr executes the runs in a container on its backend, and the logs and output come back to your console.
In post 1, we showed how to obtain an API token to utilize Scalr as a remote backend using the local Terraform CLI. This was done interactively. When using Azure DevOps Pipeline, this is an automated process so the login stage needs to be automated and not interactive.
- Generate an API token. If you didn't save the one generated in the first article, go ahead and generate a new one from the Scalr UI.

- Create a new workspace. Click on New workspace, then choose CLI. Configure the required options and press create.


- Click on 'base backend configuration'.

This will show the configuration needed for the Terraform configuration to use Scalr as the remote backend. Update the configuration file to set Scalr as the remote backend.
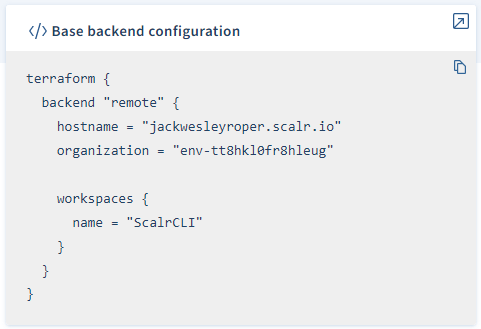
- Next in order to connect to Scalr, we need to provide the API token. This must be a user token or a team token, and cannot be an organization token according to the Terraform docs.
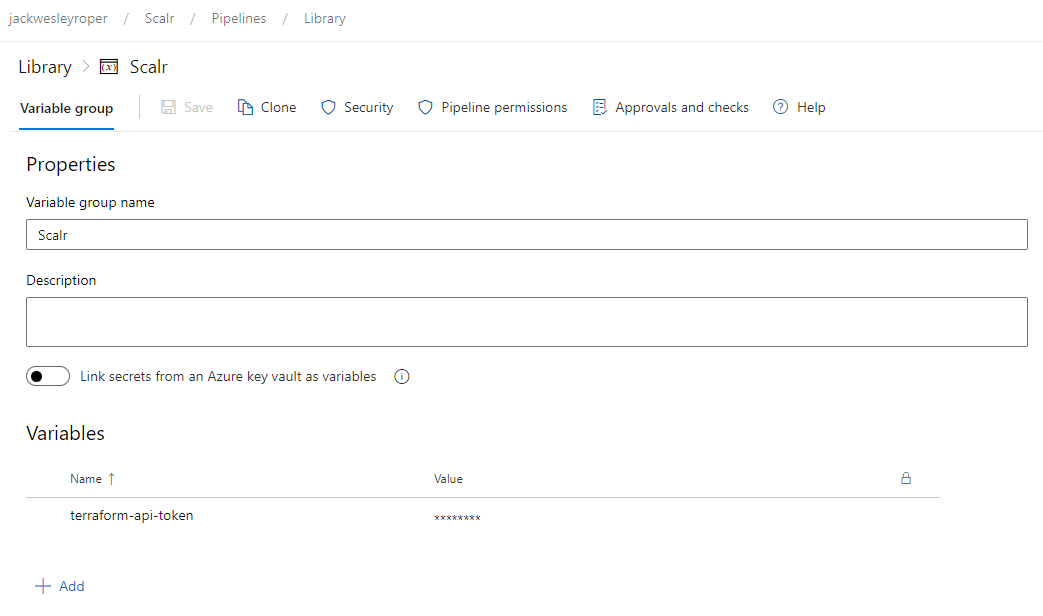
In Azure DevOps, under Pipelines -> Library -> Add a new variable group.
Add the token as a secret value, with scalr-api-token as the name.
- Add a step at the beginning of your pipeline YAML file for generating your CLI configuration file. The location of the file can be specified using the
TF_CLI_CONFIG_FILEenvironment variable. This creates a file calledterraformrcthat contains the API token. This is exactly what happens when authenticating interactively with Scalr using the CLI, here this process is automated.
variables:
- group: Scalr
steps:
- task: charleszipp.azure-pipelines-tasks-terraform.azure-pipelines-tasks-terraform-installer.TerraformInstaller@0
displayName: 'Use Terraform latest'
- script: |
RC_FILE=".terraformrc"
cat > ${RC_FILE} << EOF
credentials "jackwesleyroper.scalr.io" {
token = "$(scalr-api-token)"
}
EOF
mv .terraformrc ~/.terraformrc
export TF_CLI_CONFIG_FILE="~/.terraformrc"
name: scalr_credentials
displayName: 'Scalr Credentials'
- task: TerraformCLI@0
inputs:
command: 'init'
backendType: 'selfConfigured'
allowTelemetryCollection: true
- task: TerraformCLI@0
inputs:
command: 'plan'
allowTelemetryCollection: true
commandOptions: '-var-file="terraform.tfvars"'
- task: TerraformCLI@0
inputs:
command: 'apply'
allowTelemetryCollection: true
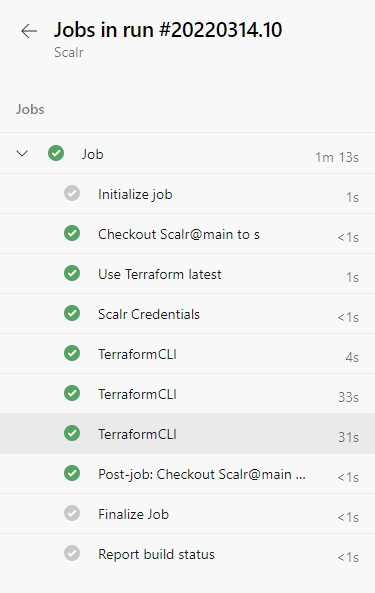
commandOptions: '-var-file="terraform.tfvars"'Once authenticated the pipeline proceeds to run terraform init, terraform plan and terraform apply.
Note that the remote backend itself does not accept the CLI -var=<variable> or -var-file=<file> options. This is a property of the remote backend protocol. (Scalr does support run-scope variables; you just define them in the workspace or via the API/provider rather than passing them as CLI flags.) If you specify the CLI flags you will receive this error:
The "remote" backend does not support setting run variables at this time. Currently the only to way to pass variables to the remote backend is by creating a '.auto.tfvars' variables file. This file will automatically be loaded by the "remote" backend when the workspace is configured to use Terraform v0.10.0 or later.*
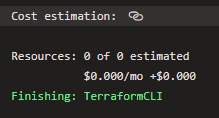
On execution, you will see the pipeline run through each stage, also with the added bonus of giving you the cost estimation at the end of the apply stage.
What Did This Series Cover?
In this final article in the series we have shown how to create a workspace, both VCS integrated and CLI-driven, and executed our Terraform code. We used an Azure DevOps pipeline to automate the workflow on the CLI-driven workspace, using Scalr as the remote backend.
Note that workspaces and variables can be created using the Scalr Terraform provider!
Cheers! 🍻

CI/CD and GitOps for Terraform & OpenTofu
Comprehensive guide to building reliable CI/CD pipelines and implementing GitOps workflows for Terraform and OpenTofu infrastructure automation.