How To Use Terraform Remote Backends
A comprehensive guide to Terraform remote backends: configuration, backup strategies, state migration, and update operations.

- A Terraform backend stores the state file Terraform uses to reconcile desired, existent, and observed resource state; backends are either local or remote.
- Remote operations backends like Terraform Cloud and Scalr both store state and execute runs, while cloud-specific backends such as azurerm, gcs, and s3 only store state and leave backups to you.
- Common remote backend operations include backing up state with terraform state pull, migrating state between backends via terraform init, and moving resources between workspaces with terraform state mv.
- Manually editing remote state requires incrementing the state serial before pushing, or the push fails with a same-serial error.
What is a Backend
A backend's main job is to store the state Terraform creates after it provisions our resources. That gives Terraform a single place to look up what it expected our resources to be from the last time we applied, and it's part of how Terraform reconciles them. To really understand backends and what they're for, you first need to understand the three forms or phases our resources can be in:
- Desired State: the state we wish for our resources to be in, represented by our Terraform code.
- Existent State: the state our resources are according to where they are deployed; in the case of Azure, it would be the state of the resources in the cloud (visible via the Portal/API).
- Observed State: the state that Terraform has observed or augmented the resources to be in at its last run; this representation is held inside state files within our backend.
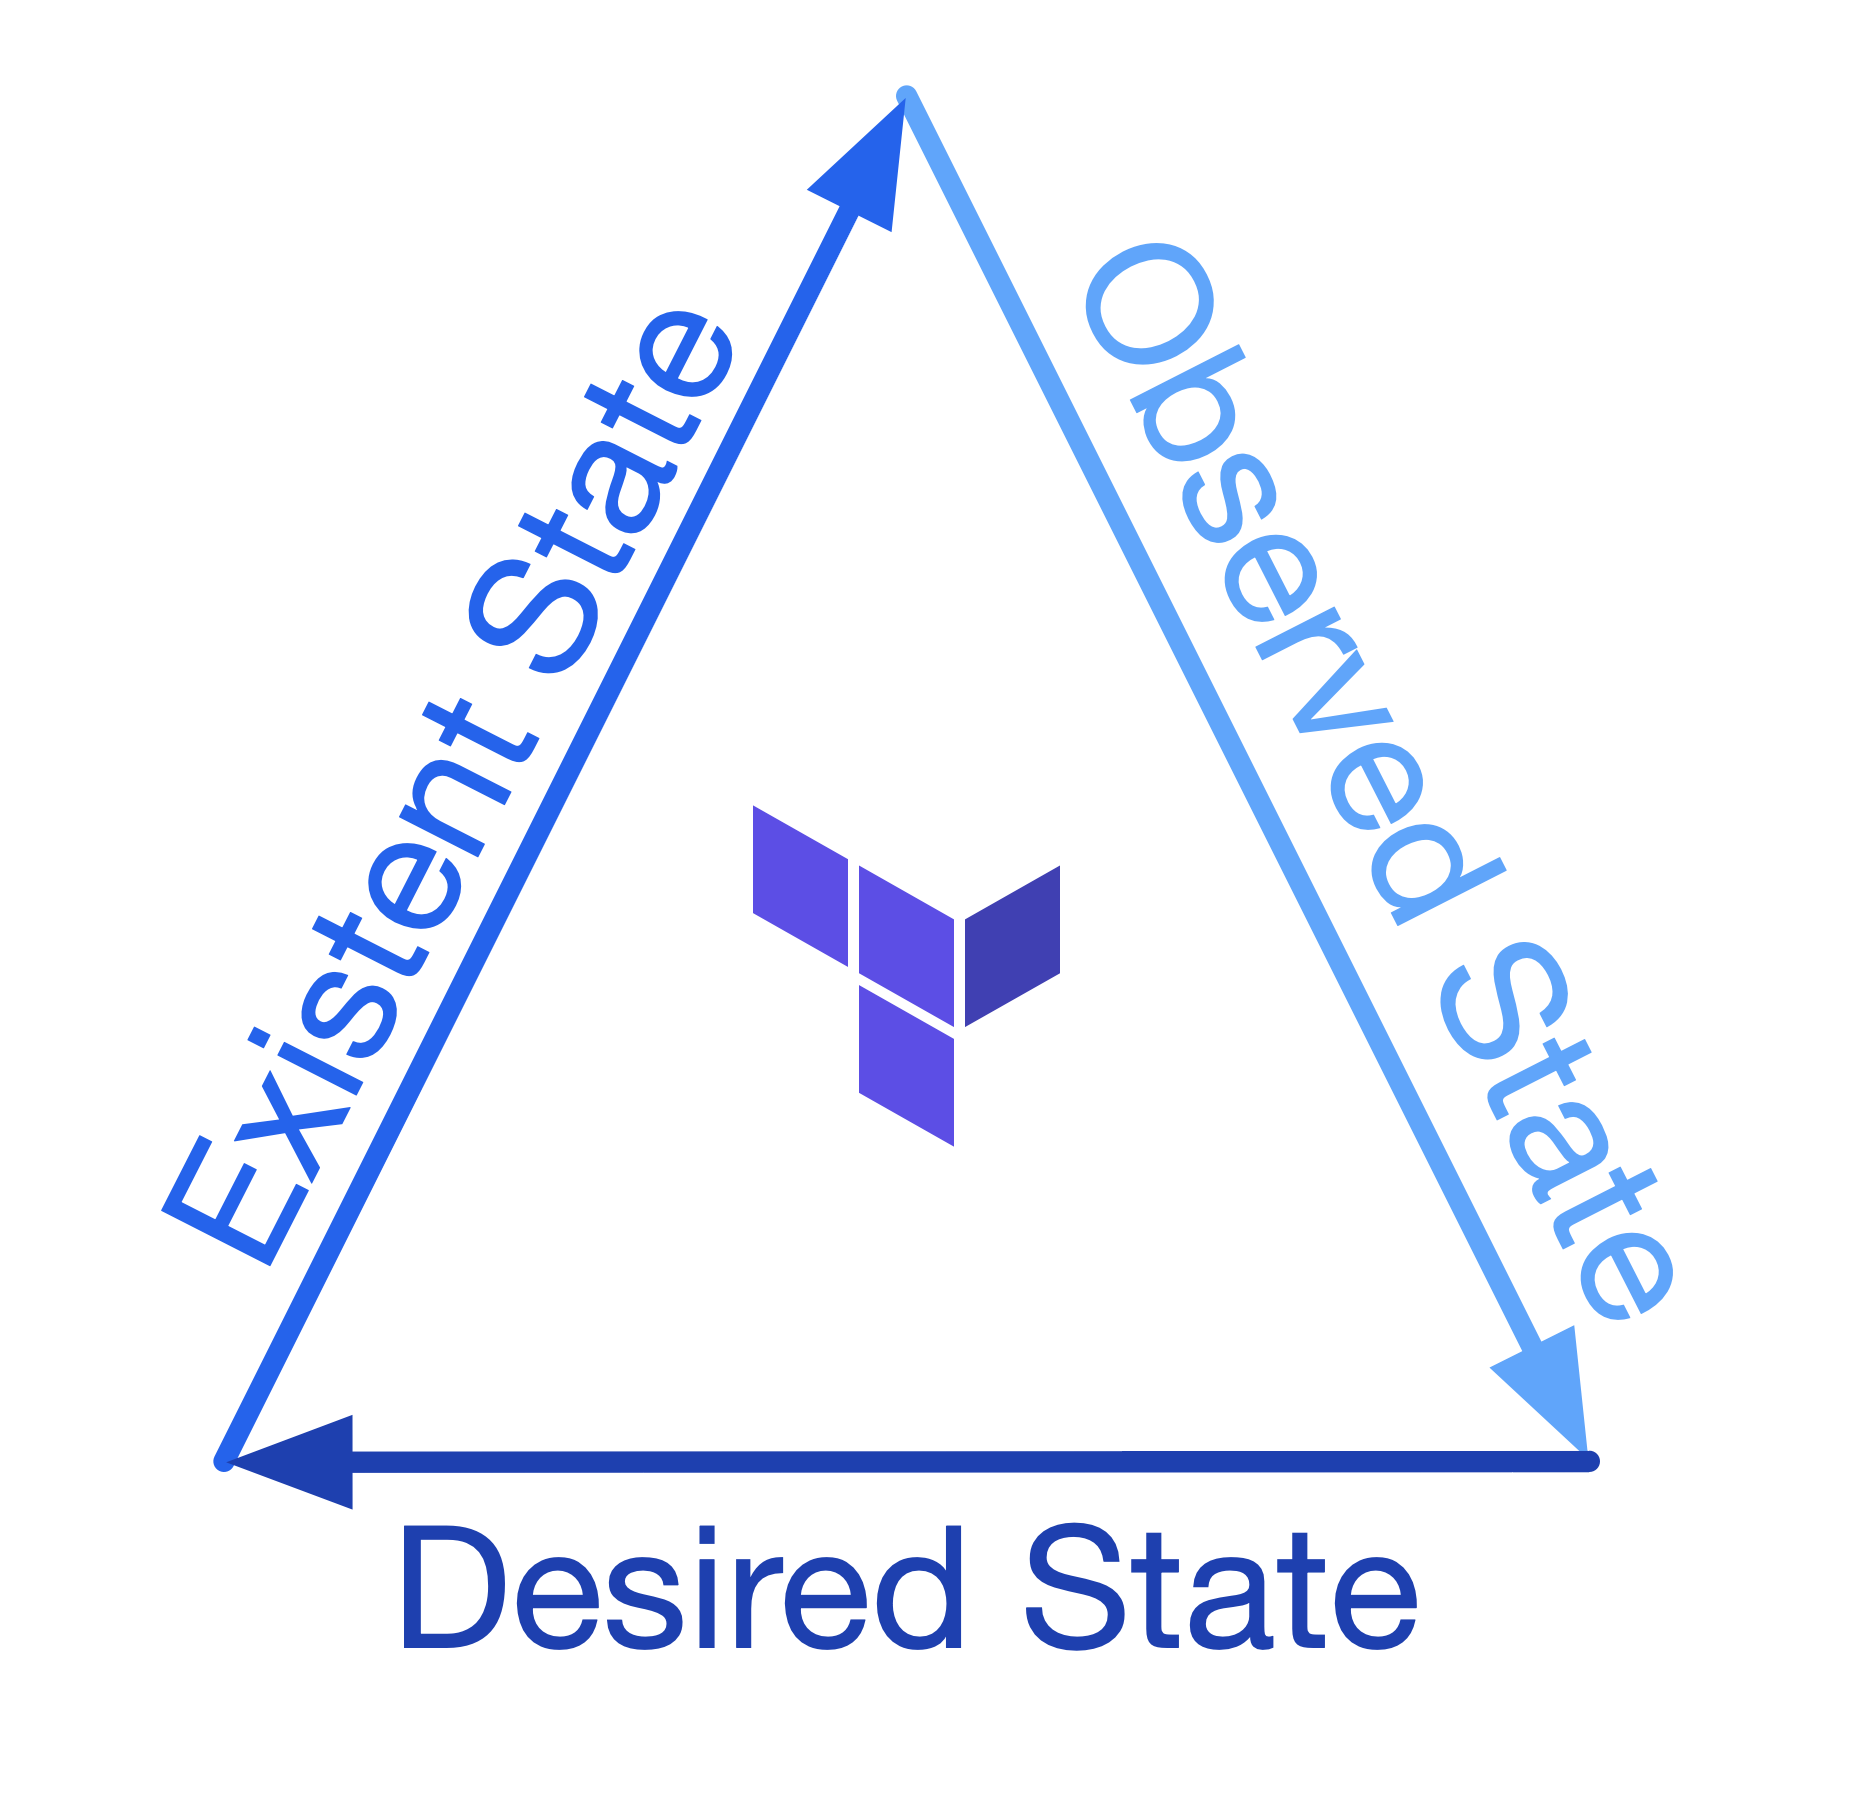
Terraform will use the three phases of our resource state to reconcile and ensure that the deployed resources are in the form we want them to be in, the desired state.
Backend Types
At a very high level, there are two types of backends:
- Local: where the state file is stored on the local filesystem.
- Remote: where the state file is stored in some remote filesystem or database.
The Remote backend type has many subtypes, which gives you a lot of flexibility in where you store state.
Local
Here's the Local Backend. You usually wouldn't configure this backend as I tend to use it when testing things locally or when starting to write Terraform for something. However, this doesn't mean that you cannot configure this backend at all. The Local backend allows you to set an optionally different workspace_dir and path for your state file. The path option must be relative to either your root module or the defined workspace_dir.
terraform {
  backend "local" {
    workspace_dir = "/Users/brendanthompson/Development/terraform-state"
    path = "awesome-project/development.tfstate"
  }
}
Remote
There are many remote backends to choose from; I will not go through all of them in this post, just the most common ones or that I see as most useful. You can, however, see an exhaustive list here.
Remote backends fall into two categories. The first is just a store for Terraform state, like the Cloud Specific Backends. The others, like Terraform Cloud and Scalr, store Terraform state and also run your Terraform code for you. That second kind saves engineers from building their own orchestration, so you can spend more time engineering!
Terraform Cloud
You can find out more about this from the official documentation for the state here.
If you're looking to be cloud-agnostic, then I would recommend using this Terraform Cloud option or the below Scalr option as they will both allow you to store state without caring about the underlying infrastructure or storage mechanism.
Cloud offers some of the best functionality out of the box, since it's the direction HashiCorp seem to be driving their products. You could read this push to Cloud as a positive or a negative, and it's worth digging into more in another post.
To configure our Terraform code to use the Cloud state, we must do this a little differently to all other ways; instead of having a backend {} block, we rather will have a cloud {} block. This block also allows us to configure other things about cloud configuration.
The code below shows how to configure our code to use the department-of-mysteries workspace in the Terraform Cloud organization ministry-of-magic.
terraform {
  cloud {
    organization = "ministry-of-magic"

    workspaces {
      name = "department-of-mysteries"
    }
  }
}
There is another argument we can use within our workspaces {} block instead of name, and that is the tags argument. Using this allows us to execute changes on any workspaces containing these tags with a single set of Terraform code.
terraform {
cloud {
organization = "ministry-of-magic"
workspaces {
tags = ["department:mysteries", "compute:kubernetes"]
}
}
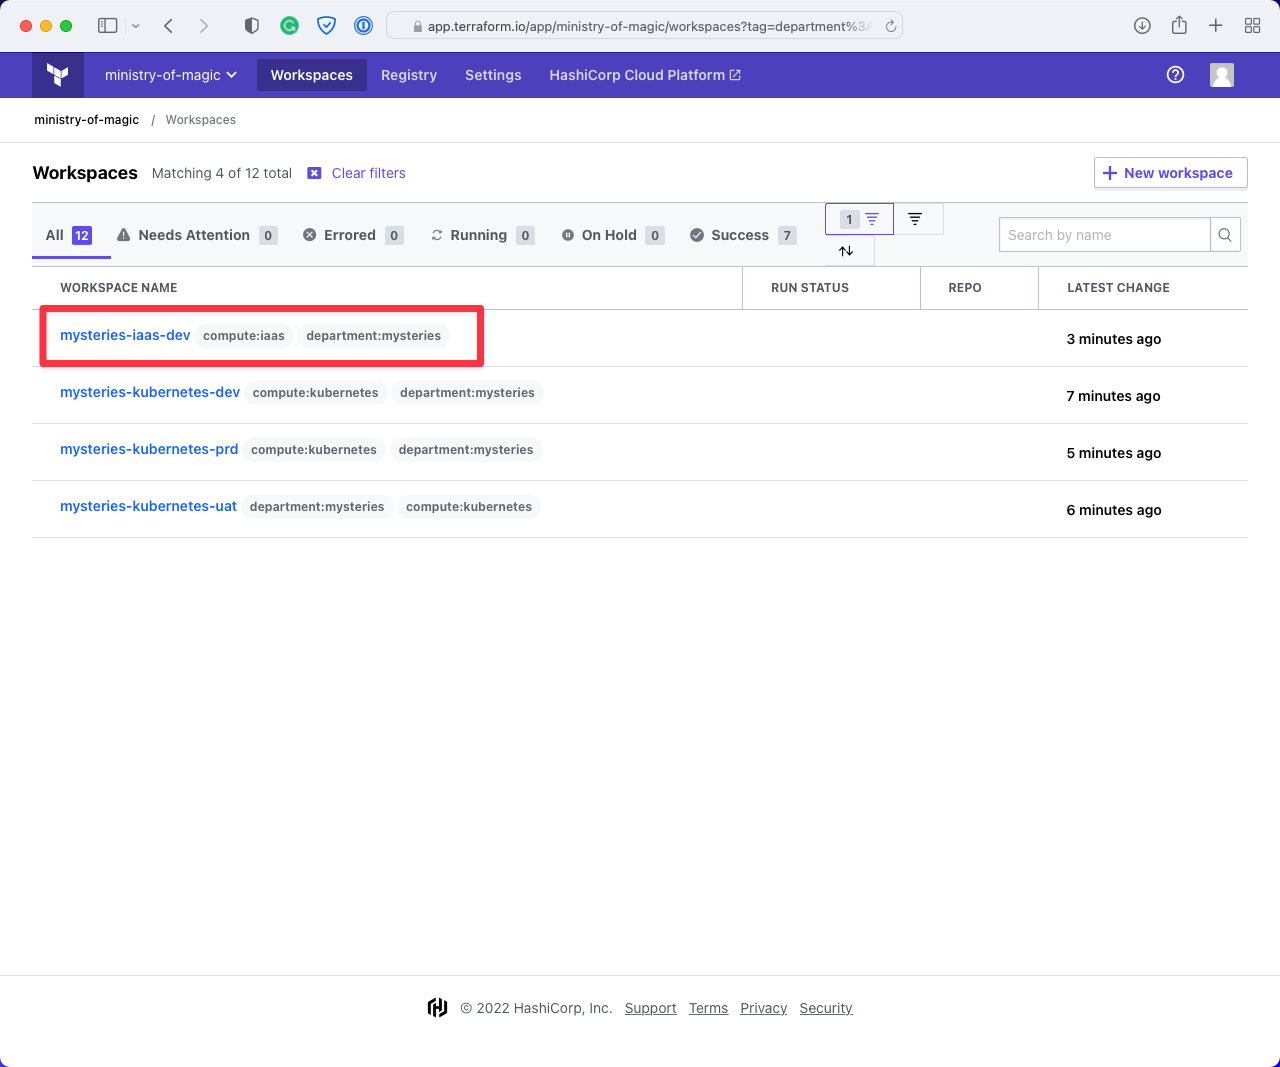
}To help articulate what is happening here a little better, below are some screenshots from this workspace.
This first screenshot shows that when we filter on department:mysteries in the Cloud console, we get workspaces for three environments for compute:kubernetes and one for compute:iaas. Since our hypothetical code deals with Kubernetes infrastructure, it could do some damage to that compute:iaas workspace.
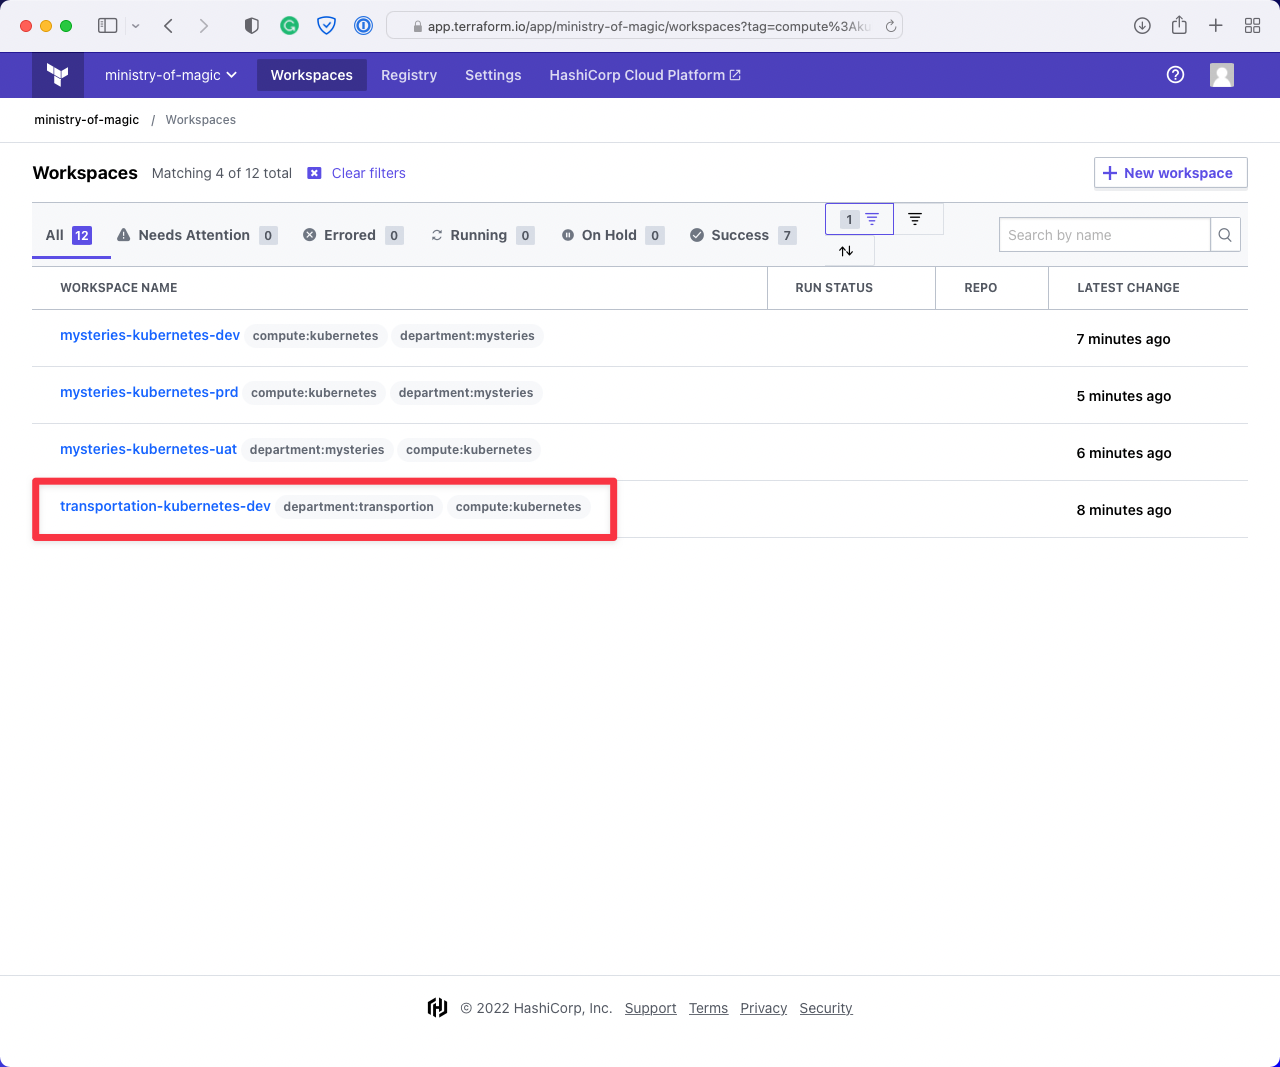
This next image shows the workspaces returned when filtering on compute:kubernetes. As you can see it is also returning us a workspace for the department:transportation, we don't want to be affecting workspaces that aren't under our remit!
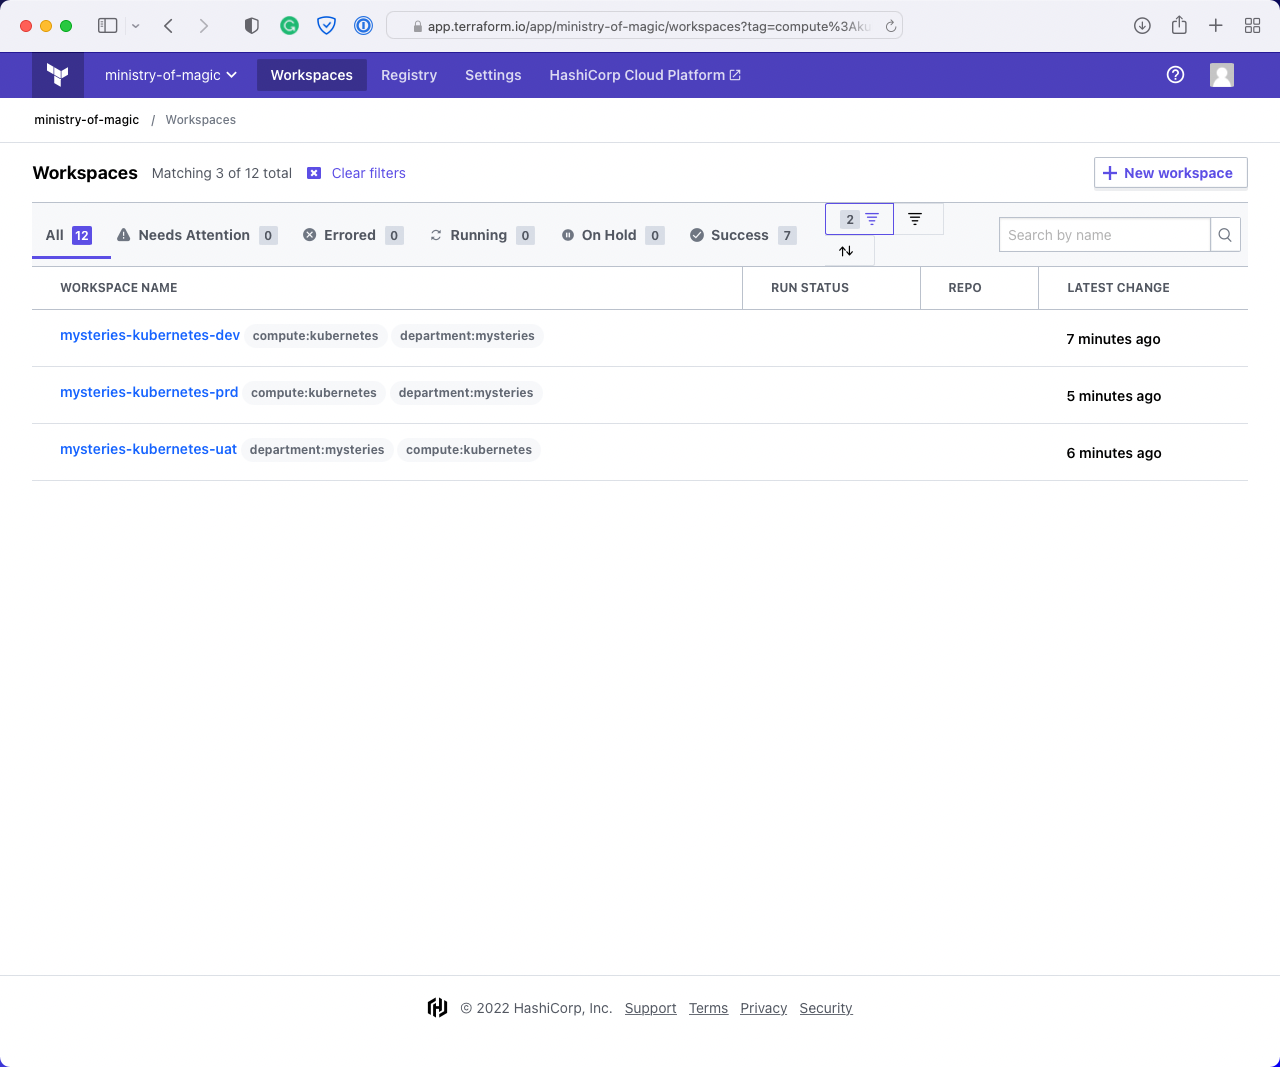
Finally, we have applied both department:mysteries and compute:kubernetes which gives us exactly what we want; all the Kubernetes workspaces for the Department of Mysteries.
Using the Terraform CLI from our codebase, we can query to see what workspaces we can execute this code on, the below screenshot shows what our example code would return.
We can check which workspace is currently selected with terraform workspace show

And finally, we can select a different workspace using terraform workspace select <Workspace_Name> that will allow our code to execute in that new workspace when triggered via the CLI.

This should show how powerful using the tags argument is for this backend type!
Scalr
The documentation around this backend type can be found within Backend Type: remote on the Terraform documentation, this is due to the fact that the Scalr backend adheres to the interface for Terraform backends.
Because Scalr adheres to the interface for backends, it's straightforward to configure our code to use it. We use the remote backend type, and we can pass in pretty much the same arguments we did for the Terraform Cloud backend type. You can use this same method with a TFC workspace, although it is no longer recommended.
Information: a crucial thing to point out here is that Scalr has this incredible concept of an Environment within their structure. This allows for really granular control over RBAC and where resources are deployed.
In this instance, we are going to deploy the ministry-of-magic organization into our Non-production environment, in the mysteries-kubernetes-dev workspace. The hostname argument refers to our instance of Scalr, the organization refers to the environment within our instance, and a workspace is just a workspace!
terraform {
  backend "remote" {
    hostname = "ministry-of-magic.scalr.io"
    organization = "env-tqaqjimtnmmgiv0"

    workspaces {
      name = "mysteries-kubernetes-dev"
    }
  }
}
Scalr supports workspace tags, but the remote backend type does not support selecting workspaces by the tags argument. For CLI-driven configurations using the remote backend, you can instead use the prefix argument to select which workspaces the code will deploy to. An example of this is below:
terraform {
backend "remote" {
hostname = "ministry-of-magic.scalr.io"
organization = "env-tqaqjimtnmmgiv0"
workspaces {
prefix = "mysteries-kubernetes-"
}
}
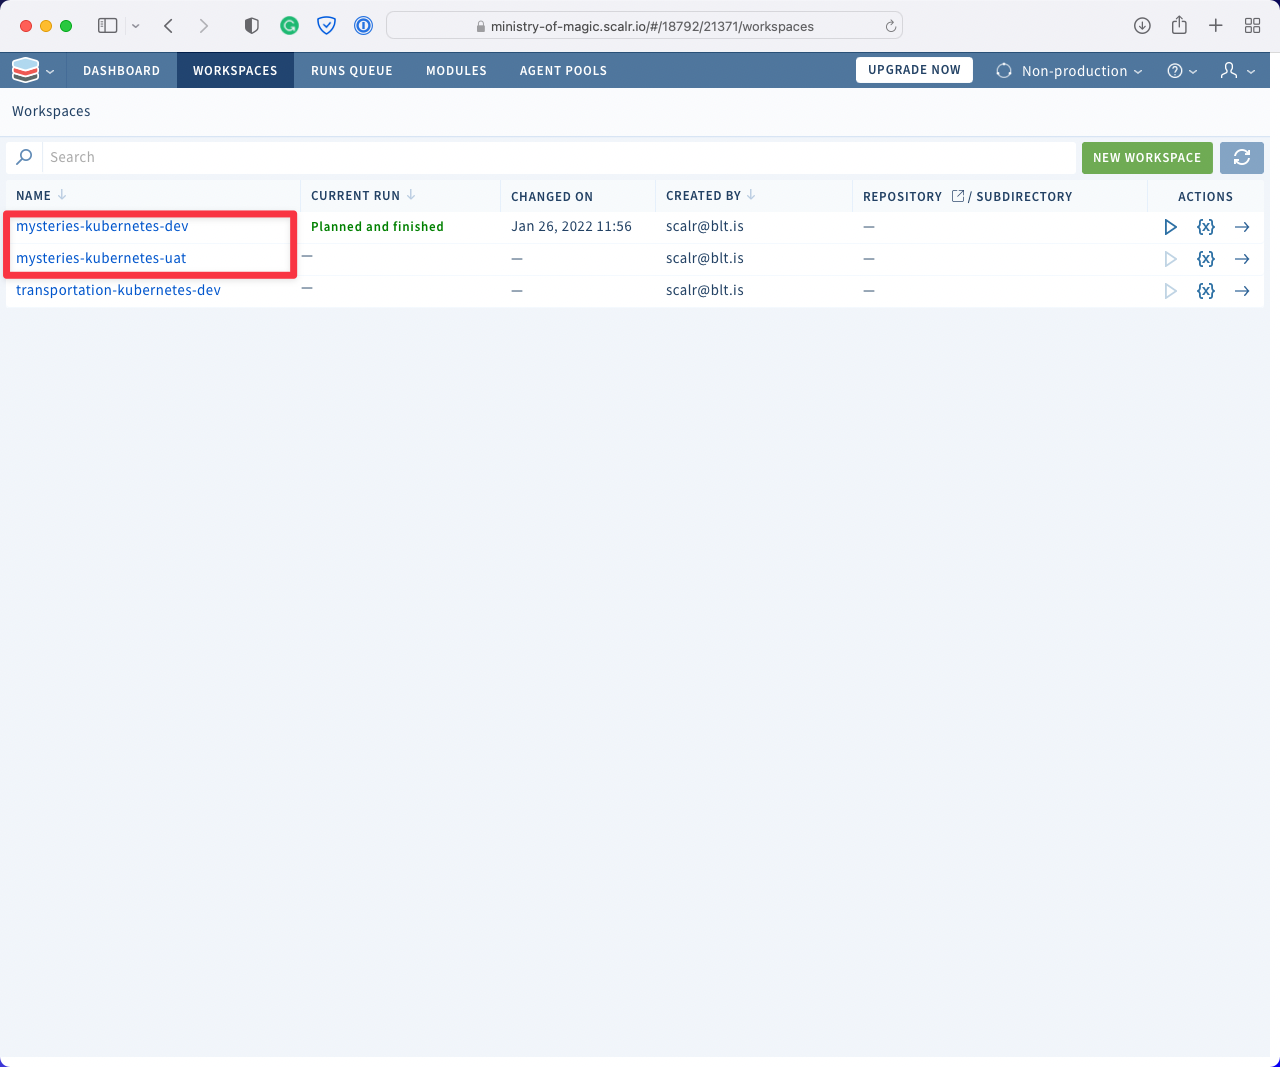
}In the below screenshot, I have highlighted the workspaces that the code would apply to.
The same as with Terraform Cloud we need to use the terraform workspace subcommands to switch between our different environments.
With terraform workspace show we get:

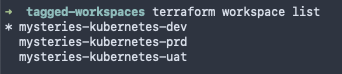
With terraform workspace list we can see the two workspaces, as expected:

And finally we can select our uat workspace with terraform workspace select:

Cloud Specific Backends
Now we move on to the Cloud Specific Backends. These all rely on a particular cloud's storage service, and they lock you into that cloud vendor somewhat, since you're using one of its services to store your state. One important thing to keep in mind here: you are now responsible for backing up your state files in case they get corrupted or you need to restore them. With the other remote backends, Terraform and Scalr both take care of that for you.
Azure: azurerm
The documentation for azurerm can be found on the Terraform documentation website.
With the azurerm backend we need to think about a few more things than in the previous scenarios, so here's an example broken down.
terraform {
  backend "azurerm" {
    resource_group_name  = "rg-aus-prd-mom-state"
    storage_account_name = "saausprdmomstate"
    container_name       = "dev"
    key                  = "mysteries-kubernetes.terraform.tfstate"
  }
}
As you can see above, we have to configure several arguments so Terraform knows where to put our state file and what to call it. Here's what each one does:
- resource_group_name: the Azure resource group where the storage account is provisioned.
- storage_account_name: the storage account where our storage container exists.
- container_name: the name of the storage container where our state files will live. As a rule of thumb I will create a container for either each environment I am deploying to or each area.
- key: the file name of the state file itself. Depending on what I have done with the container_name I will prefix the key with the area or the environment.
When I talk about area above this could refer to a few things which I have listed below, it could even be a combination of a few or all of these:
- Region: the region with Azure where the resources are deployed.
- Project: the abbreviation of a project to which the resources belong to.
- Resource Domain: the domain of the resources, e.g. networking, identity or compute.
- Consumption Domain: the domain consuming these resources, think a department in a business.
You can configure authentication for this backend in several ways. I'd recommend checking what your organisation already uses for Azure authentication, then reading the backend docs to see how to set that up with the backend.
GCP: gcs
The documentation for gcs can be found on the Terraform documentation website.
Google Cloud Storage, or GCS, is the Cloud Specific Backend for Google Cloud Platform (GCP), and it has a few things in common with the Azure variant. Configuring gcs is a bit simpler than azurerm because it needs fewer arguments. Unlike Azure, Google Cloud scopes your client automatically to a Google Cloud Project, which is the smallest level of grouping available on GCP, so we don't need to include any of that in our backend config.
Below I have used the same example as I have with azurerm so you can easily see how things change:
terraform {
  backend "gcs" {
    bucket  = "gcs-syd-prd-mom-state"
    prefix  = "dev/mysteries-kubernetes"
  }
}
By default Terraform will create a state file called default.tfstate in the bucket dev/mysteries-kubernetes. Now, if you were to use terraform workspace it would create a file named after whatever is shown in terraform workspace show.
AWS: s3
The documentation for s3 can be found on the Terraform documentation website.
Finally for our Cloud Specific Backends we have our Amazon Web Services (AWS) option of an s3 bucket! The same as with Azure and GCP we are storing our state in a storage container, s3 requires close to the same parameters as GCS as you will see below:
terraform {
  backend "s3" {
    bucket = "s3sydprdmomstate"
    key    = "dev/mysteries-kubernetes.tfstate"
    region = "ap-southeast-2"
  }
}
We have had to define three things here:
- bucket: the name of the s3 bucket where our state will reside.
- key: the pathway within our bucket where the state will be placed, this should follow a logical structure and the final segment will become the name of the state file.
- region: the AWS region where the bucket exists.
Important note: if you are using terraform workspace with an s3 backend the structure within the bucket will change slightly. If we said that we had done terraform workspace select uat and our key was set to mysteries-kubernetes.tfstate we would end up with a bucket pathway/key that looked like: s3sydprdmomstate/env:/uat/mysteries-kubernetes.tfstate
Remote Backend Operations
Now that we understand how to configure each backend type, here are the most common operations you'll need to perform: backing up state, migrating state between backends, and updating state in a remote backend.
Authentication Setup
Before performing any remote backend operation with a platform like Scalr, you need an API token. Run the following to authenticate:
terraform login <account-name>.scalr.ioThis will redirect you to Scalr to retrieve your API token. Then add the remote backend settings to your Terraform configuration:
terraform {
  backend "remote" {
    hostname = "<my-account>.scalr.io"
    organization = "<ID of environment>"
    workspaces {
      name = "<workspace-name>"
    }
  }
}
These backend settings will be different per workspace and environment, so be sure to update them as you go. Any Terraform commands will now run remotely.
For authentication tokens, you can use either a personal access token or a service account token. A personal token works for one-off scenarios, but for regular operations you should use a service account token. In Scalr, service account tokens can be obtained from the IAM section under service accounts.
Backing Up Terraform State
When you use a remote operations backend like Scalr or Terraform Cloud, your state is stored encrypted. But for mission-critical infrastructure you may want extra backups in a location of your choice.
One-Off State Pull
The simplest backup approach is pulling a specific state file down locally. Ensure your remote backend configuration is correct, then run:
terraform init
Once confirmed that the backend is connected, pull the state:
terraform state pull > terraform.tfstate
You now have the state file locally to archive wherever you choose.
Bulk State Backups
For organizations that want to back up all state files on a regular cadence, an external script can automate this. Scalr provides a Python script that pulls all state files at once.
Install the requirements:
pip3 install -r requirements.txt
Then run:
download_state_files.py --host example.scalr.io --token xxx --output-dir /tmp/scalr-state-files
This can be run manually or on an automated schedule (e.g., nightly).
Backup After Every Apply
For near-real-time backups, you can use custom hooks that run after terraform apply. In Scalr, custom hooks are configured in workspace settings.
To back up state to an S3 bucket after every apply, add this as a post-apply hook:
aws s3 cp <(terraform show) s3://my-bucket/my-state.json
Scalr has CLI tools for AWS, Azure, and GCP pre-installed in the run environment. Just ensure you pass your cloud credentials as environment variables into the run, either by exporting provider configurations or adding them directly in the workspace.
Migrating State to a Remote Backend
There are two migration scenarios: local to remote, and remote to remote.
Local to Remote Migration
Simply add the remote backend block to your configuration and run:
terraform init
Terraform will detect the existing local state and offer to copy it to the new remote backend. If you'd rather keep backend values out of your code, our practical guide to terraform init -backend-config covers passing them in at init time.
Remote to Remote Migration
Update your backend settings to point to the new remote backend. For example, moving from S3 to Scalr means replacing your S3 backend block with the remote backend block. Then run terraform init and Terraform will handle the migration.
Best practice: Stop any jobs that might update the state while performing a migration.
Moving Resources Between Workspaces
Breaking monolithic workspaces into smaller ones is a common best practice. Here is a step-by-step process for splitting resources across remote workspaces:
Step 1: Authenticate to your remote backend using terraform login.
Step 2: Add the remote backend block pointing to the source workspace.
Step 3: Pull the current state locally:
terraform state pull > terraform.tfstate
Step 4: Switch to a local backend by commenting out the remote backend configuration.
Step 5: Run terraform init -reconfigure to update the backend. If needed, explicitly set the backend to local:
terraform {
  backend "local" {
  }
}
Step 6: Move resources to a new state file:
terraform state mv -state-out=terraform-second.tfstate <source.address> <destination.address>
Step 7: Refactor your Terraform code into separate directories for each workspace, and re-enable the remote backend in each.
Step 8: Run terraform init on the new workspace. When prompted to copy existing state, answer "yes."
Step 9: Push the updated state back to the original workspace by re-enabling the remote backend and running terraform init -reconfigure. Again, answer "yes" when prompted to copy state.
Updating State in a Remote Backend
Sometimes you need to manually update the state file. For example, to fix a mistake, make a quick correction, or handle a migration. Here are the key operations. (For the serial-conflict error, locking, and the UI-based alternatives Scalr offers, see the dedicated guide to updating state in a remote backend.)
Manual State Editing
Pull the state locally:
terraform state pull > terraform.tfstate
Make your edits, but the serial of the local state must be incremented by at least one compared to the remote state. For example, if the remote state has serial set to 3, set the local copy to 4 before pushing.
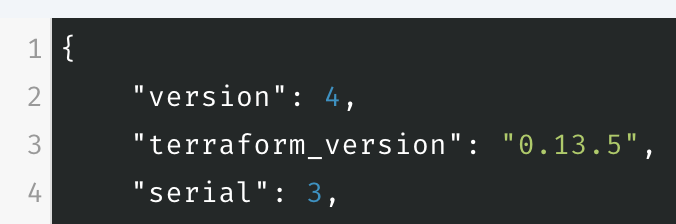
Checking the state serial in Scalr
Push the updated state:
terraform state push terraform.tfstate
If the serial is not incremented, you will see: "Failed to write state: cannot overwrite existing state with serial 1 with a different state that has the same serial."
Importing Resources
To bring existing infrastructure under Terraform management in a remote backend, define the resource and run:
terraform import aws_instance.scalr i-0d13d5591a41e18ef
This works the same as with a local backend, no special steps are needed.
Using the Moved Block
In Terraform 1.1+, the moved block lets you refactor code without breaking changes. This works the same way with remote backends:
moved {
  from = aws_instance.scalr
  to   = aws_instance.scalr1
}
Then simply run terraform apply.
Refresh-Only Mode
The terraform apply -refresh-only command updates your state to match actual infrastructure, useful for detecting drift (e.g., someone changed tags directly in the cloud console).
Removing Resources from State
If resources were destroyed outside of Terraform, remove them from state with:
terraform state rm <resource_address>
Closing Out
This post has covered the most common backend types for Terraform, how to configure them, and the key operations you'll run with remote backends: backing up state, migrating between backends, moving resources between workspaces, and updating state. There are plenty of ways to configure and use each of these, but this guide should give you enough to get started and manage your Terraform state well.
If you'd rather not operate backend infrastructure yourself, managed remote backends bundle state storage, locking, and versioning. Scalr's is included in its per-run pricing, with no per-workspace charge, so splitting state across more workspaces doesn't change the bill.
If you're interested in how you dynamically set up backends to make your code even more efficient then check out Dynamic backend blocks with OpenTofu
Frequently asked questions
What is a Terraform backend and what does it do?
A backend stores the state file Terraform creates after provisioning resources, giving Terraform a single place to look up what it expected resources to be after the last apply. Terraform reconciles three forms of state: desired state (your code), existent state (what's actually deployed), and observed state (what's recorded in the state file). Backends come in two types: local, where state lives on your filesystem, and remote, where it lives in a remote filesystem or database.What is the difference between a remote operations backend and a cloud storage backend?
Cloud-specific backends like azurerm, gcs, and s3 only store your Terraform state, and you become responsible for backing it up. Remote operations backends like Terraform Cloud and Scalr store state and also run your Terraform code for you, so you don't have to build your own orchestration. They also handle state backup and encryption on your behalf.How do I migrate Terraform state to a remote backend?
For a local-to-remote migration, add the remote backend block to your configuration and run terraform init; Terraform detects the existing local state and offers to copy it over. For remote-to-remote, replace the old backend block with the new one and run terraform init the same way. Stop any jobs that might update the state while the migration is in progress.Why does terraform state push fail with a same-serial error?
When you manually edit a pulled state file, the serial in your local copy must be incremented by at least one compared to the remote state before you push. If the remote state has serial 3, set your local copy to 4. Otherwise Terraform refuses the push with an error saying it cannot overwrite existing state with a different state that has the same serial.
Terraform State & Backends: The Complete Guide
Learn how to set up and customize Terraform backend configs with terraform init. Step-by-step examples for remote state, workspaces, and CI/CD.