Terraform Troubleshooting, Optimization and Error Resolution
Speed up Terraform runs, shrink state files, and keep infrastructure code clean with the actionable tips in this Terraform Optimization Guide.

- State splitting is the highest-impact optimization: organizations report 70-90% reductions in operation times by dividing monolithic state into component stacks once they pass roughly 500 resources or 50MB of state.
- Most Terraform out-of-memory failures (exit code 137) come from provider schema loading and dependency graph construction, not resource count. Each provider instantiation is a separate process consuming hundreds of megabytes.
- Module-level depends_on is a common hidden cause of slow plans: it makes every resource in the dependent module wait on every resource in the referenced module, and Terraform pays that cost on each of its multiple graph walks per run.
- TF_PLUGIN_CACHE_DIR has no effect in remote execution because the runner manages init; provider and module caching must be configured at the agent layer instead.
- 40% of InvalidClientTokenId authentication failures trace to special characters (+, /) in AWS credentials; regenerating keys or switching to credential files resolves most cases.
- Before tuning HCL, measure where run time actually goes. Queue time waiting for a free runner slot and provider retry loops can dwarf actual plan execution.
- A stuck plan or apply usually comes from one of four distinct timeout sources: the state lock wait (-lock-timeout), a backend's own request timeout, a provider's API client timing out, or the CI/CD job or platform run timeout killing the process mid-operation.
- Terraform 1.10 and OpenTofu both shipped real performance work since 2024, but on different parts of the pipeline (plan/apply decoding vs. large-graph handling vs. provider install concurrency), so neither engine is uniformly faster; state size and graph shape decide more than which binary you run.
Most slow or failing Terraform runs trace back to a short list of causes: oversized dependency graphs, provider processes eating memory, caching that was configured in the wrong place, and credentials that fail in non-obvious ways. This guide covers those causes and their fixes, error by error, with numbers from incidents we've actually debugged in Scalr's support queue.
What Should You Check First When Terraform Fails?
Before advanced debugging, start with these quick checks that resolve many common errors in seconds.
Read the Error Message: Terraform's error messages are descriptive. They point to exact line numbers and tell you whether you're dealing with a syntax error, a missing argument, or a provider issue, so read them before doing anything else.
Run terraform validate: Check your configuration files for syntax and internal consistency without accessing remote state or services. This catches typos and structural mistakes immediately.
Run terraform plan: This "dry run" shows exactly what Terraform intends to create, modify, or destroy. It catches logical errors like misconfigured dependencies or unexpected changes to existing resources.
Check Provider Credentials and Permissions: A lot of issues come down to missing permissions. Make sure your credentials (access keys, IAM roles) can actually create and manage the resources you're after.
How Do You Debug Common Terraform Errors?
Enabling Detailed Logging
When initial troubleshooting doesn't provide enough information, enable Terraform's detailed logging using the TF_LOG environment variable:
- TRACE: Most verbose, showing every internal action and provider plugin interaction
- DEBUG: Detailed logs of provider and backend interactions (good starting point)
- INFO: High-level execution messages
- WARN: Non-critical warnings
- ERROR: Fatal errors only
Enable logging with:
export TF_LOG=DEBUG
terraform plan

# Save logs to file for easier analysis
export TF_LOG=TRACE
export TF_LOG_PATH="terraform-debug.log"
terraform apply
Examining Terraform State
The state file is a JSON document mapping resources in your configuration to real-world infrastructure. Inconsistencies here cause errors.
Use these commands to inspect state:
# List all resources Terraform is managing
terraform state list

# Inspect attributes of a specific resource
terraform state show <resource_address>

# Update state file to reflect current infrastructure
terraform refresh
Using Terraform Console
The terraform console is an interactive environment for evaluating expressions and testing logic:
terraform console

# Check variable values
> var.instance_type
"t2.micro"

# Test complex expressions
> flatten([["a", "b"], ["c"]])
[ "a", "b", "c" ]
What Causes the InvalidClientTokenId Authentication Error?
The InvalidClientTokenId error (HTTP 403) is one of the most frustrating AWS authentication issues. It shows up in a few different forms, but it always stops your deployment dead.
Root Causes and Statistics
Based on analysis of thousands of error reports:
- 40% of cases: Special characters in AWS credentials (+, /, @, !, )
- 25% of cases: Missing session tokens for temporary credentials
- 20% of cases: Environment variable conflicts
- 15% of cases: Expired temporary credentials or region issues
The 30-Second Quick Fix
Step 1: Clear conflicting environment variables
unset AWS_ACCESS_KEY_ID AWS_SECRET_ACCESS_KEY AWS_SESSION_TOKEN AWS_SECURITY_TOKENStep 2: Regenerate credentials without special characters. If your AWS secret key contains +, /, or other special characters, regenerate new credentials immediately.
Step 3: Verify credential status
aws configure list
aws sts get-caller-identity
Step 4: Add missing session token for temporary credentials
provider "aws" {
  access_key = "ASIA..."  # Temporary keys start with ASIA
  secret_key = "..."
  token      = "..."      # Often missing for temporary credentials
  region     = "us-east-1"
}
Special Characters in Credentials in depth
AWS secret access keys can contain 40 alphanumeric characters plus forward slash (/) and plus (+). These special characters cause failures through three mechanisms:
URL encoding failures: AWS signature calculation requires proper URL encoding. Forward slashes must be %2F, plus signs must be %2B.
Shell interpretation issues: Different shells handle special characters differently, which can corrupt the credentials in transit.
Base64 encoding corruption: Credentials often get base64-encoded somewhere along the way, and special characters can get mangled during the encode/decode round trip.
Most problematic characters ranked by frequency:
- Forward slash (/) - 40% of special character issues
- Plus sign (+) - 35% of issues
- Equals sign (=) - 15% of issues
- Backslash () - 10% of issues
Solutions
Option 1 (Recommended): Keep regenerating AWS access keys until you get ones without special characters.
Option 2: Use credential files instead of environment variables:
# ~/.aws/credentials
[default]
aws_access_key_id = AKIAIOSFODNN7EXAMPLE
aws_secret_access_key = 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
Credential files handle special characters more reliably than environment variables.
Option 3: Proper shell escaping (less reliable)
export AWS_SECRET_ACCESS_KEY='kWcrlUX5JEDGM/LtmEENI+aVmYvHNif5zB+d9+ct'Credential Precedence
Terraform follows this strict credential hierarchy:
- Environment variables (AWS_ACCESS_KEY_ID, AWS_SECRET_ACCESS_KEY, AWS_SESSION_TOKEN)
- Shared credential files (~/.aws/credentials)
- EC2 Instance Metadata (when on EC2)
- ECS Task Role (when in ECS)
- Provider configuration parameters (highest priority)
Environment variables override credential files, causing authentication failures when old variables exist.
Docker and CI/CD Authentication Patterns
GitHub Actions with OIDC (Recommended):
name: Terraform
on: [push]

permissions:
  id-token: write
  contents: read

jobs:
  terraform:
    runs-on: ubuntu-latest
    steps:
      - uses: actions/checkout@v3

      - name: Configure AWS credentials
        uses: aws-actions/configure-aws-credentials@v2
        with:
          role-to-assume: arn:aws:iam::123456789012:role/github-actions
          aws-region: us-west-2

      - name: Terraform Init
        run: terraform init

      - name: Terraform Plan
        run: terraform plan
Docker volume mount (production recommended):
docker run -v $HOME/.aws:/root/.aws:ro \
           -v $(pwd):/workspace \
           -w /workspace \
           hashicorp/terraform:latest plan
How Do You Resolve Terraform State Lock Errors?
State locks prevent concurrent modifications that lead to corruption. Common scenarios and solutions are covered in detail in our emergency solutions and prevention guide for state lock errors.
When a lock persists after an operation completes, use:
terraform force-unlock LOCK_IDAlways enable state locking with remote state backends (AWS DynamoDB, GCP, Scalr, Terraform Cloud) to prevent concurrent writes. If state corruption does occur, see empty Terraform state file recovery for restoration steps.
Why Does Terraform Run Out of Memory?
Memory problems show up a lot once you scale infrastructure. Terraform and OpenTofu are written in Go, and for safety they load a huge amount of data into RAM. The AWS provider is one of the worst offenders. See our AWS Provider memory explosion survival guide for v4.67.0+ for AWS-specific mitigations.
Root Causes
Provider Schema Loading (Primary Cause): When you run plan, Terraform loads the entire schema for every provider. Large providers like AWS (400-800MB+ RAM), Azure (500MB-1GB+), and Google (300-600MB) have enormous schemas. Multiple provider versions or aliases spawn separate processes, each with its own memory overhead.
The multiplication is what catches people. One customer hit The run has reached the memory limit (3072m) after changing a single variable on a workspace that had been stable for months. The debug output showed azurerm instantiated 11 times (a module plus a remote-state read each spun up their own provider copy), and each instantiation is a separate process consuming several hundred megabytes. The workspace had been sitting at 99% of its 3 GB ceiling the whole time (3.047 GB at the kill); a >= 4.57.0 version constraint had let the provider auto-float to a heavier release, and that pushed it over. The fixes were unglamorous: consolidate provider blocks, pin provider versions, and eventually split the workspace.
Dependency Graph Complexity: Before creating any resource, the engine builds a directed acyclic graph (DAG). A configuration with 1,000 resources consumes hundreds of megabytes tracking every dependency and variable.
Graph cost is driven by dependency edges, not resource count. One customer blew through a 4096m memory limit during plan on a workspace with only seven resources, right after upgrading the AWS provider to 6.39.0. The memory was going to graph construction, specifically the AttachDependenciesTransformer step, because a broad module-level depends_on combined with four to five levels of module nesting (module.a.module.b.module.c.module.d) produced dependency lists spanning nearly the entire configuration. The graph build alone ran about two minutes before the kill. Scoping depends_on to specific outputs and flattening the nesting resolved it.
State File Bloat: Large monolithic state files have to be parsed in full and held in memory during the "Refreshing State" phase.
Identifying OOM Errors
- Exit Code 137: The most common error. OS or container orchestrator terminated the process for exceeding memory limits.
- runtime: out of memory: Go-specific crash where the system refused a memory allocation request.
- rpc error: code = Unavailable: Provider process crashed due to OOM, unable to communicate with main binary.
Fixing Memory Errors
1. Enable Provider Schema Caching (Terraform 1.6+, OpenTofu 1.7+):
Create or edit ~/.terraformrc:
plugin_cache_dir = "$HOME/.terraform.d/plugin-cache"
Or set as environment variable:
export TF_PLUGIN_CACHE_DIR="$HOME/.terraform.d/plugin-cache"Symlinks provider binaries rather than copying, reducing I/O memory spikes.
One caveat for remote execution: a team running agents on ECS set TF_PLUGIN_CACHE_DIR and saw no effect at all. In remote runs the runner manages init, so an environment variable set in the workspace never reaches it. Caching has to be configured at the agent layer instead. On Scalr agents that means SCALR_AGENT_CACHE_DIR plus SCALR_AGENT_PROVIDER_CACHE_ENABLED (module caching is available the same way), with the cache directory on persistent storage such as EFS so it survives container replacement. Once moved to the agent layer, caching worked as expected.
2. Use AWS Enhanced Region Support (AWS Provider 6.0+):
Before: 20 aliases = 20 processes (8GB+ RAM) After: 1 provider = 1 process (800MB RAM)
Old approach with aliases:
provider "aws" {
  region = "us-east-1"
}

provider "aws" {
  alias  = "west"
  region = "us-west-2"
}

resource "aws_vpc" "west" {
  provider   = aws.west
  cidr_block = "10.1.0.0/16"
}
New approach with resource-level region:
provider "aws" {
  region = "us-east-1"
}

resource "aws_vpc" "west" {
  region     = "us-west-2"  # No alias needed
  cidr_block = "10.1.0.0/16"
}
3. Reduce Parallelism:
terraform plan -parallelism=3Trade speed for stability by reducing concurrent operations from the default 10.
4. Split Monolithic State Files:
If state files exceed 50MB, refactor into logical stacks (network, data-layer, app-layer). Smaller dependency graphs mean lower memory ceilings.
How Do You Optimize Terraform Provider Configuration?
If you're upgrading the AWS provider, also review what's breaking in AWS Provider v6.0 before bumping versions.
Provider Configuration Optimization
Skip expensive validation calls and optimize retries:
provider "aws" {
  region = "us-east-1"

  # Skip expensive validation calls
  skip_credentials_validation = true
  skip_metadata_api_check     = true
  skip_region_validation      = true

  # Request tokens for idempotency
  retry_mode = "standard"
  max_retries = 25
}
Use resource-specific timeout configuration:
resource "aws_db_instance" "main" {
  identifier = "primary-database"
  engine     = "postgres"

  timeouts {
    create = "40m"
    update = "80m"
    delete = "40m"
  }
}
Why Do Terraform Plan and Apply Operations Fail Because of depends_on?
Dependency Issues
When resources fail to apply due to dependency problems, verify with:
terraform graph | grep depends_ondepends_on deserves more suspicion than it usually gets, and module-level depends_on most of all. A team running self-hosted agents watched plan times degrade from 8 minutes to 40 while their resource count barely moved (1,150 to 1,190). Hardware was ruled out first. The agents ran on r6a.2xlarge EKS nodes with 2-CPU/19Gi pods, nowhere near saturated. The debug logs pointed elsewhere: a single module-level depends_on referencing entire modules gave every resource in the configuration 1,347 dependencies during the plan walk, and zero during the validate walk, which is why terraform validate stayed fast and made the problem look like infrastructure rather than configuration.
The cost compounds because Terraform walks the graph multiple times per run: once for validate, once for plan, and once preparing the apply. The logs showed three nearly identical silent gaps of 624, 617, and 615 seconds, accounting for roughly 30 of the 38 minutes. Scoping the depends_on to the specific output it actually needed brought plans back to normal. The general rule: a module-level depends_on makes every resource in the dependent module wait on every resource in the referenced module, and you pay that bill on every graph walk.
Resource Targeting (Emergency Use Only)
Apply specific resources during troubleshooting:
terraform plan -target=aws_instance.web
terraform apply -target=aws_instance.web
Refresh vs. Plan
Understand the difference:
terraform refresh: Updates state file without planning changesterraform plan: Plans changes based on current state- Use
-refresh=falseon known-stable infrastructure for 20-40% faster plans
Plan and Apply Timeouts
A stuck plan or apply almost always traces to one of four distinct places, and they're easy to mix up because they all just look like Terraform hanging.
State lock timeout. If another operation holds the lock, Terraform waits for -lock-timeout (0 seconds by default, so it fails immediately unless you set one) before giving up. This is a concurrency problem, not a performance one; see Terraform state lock errors for the full troubleshooting path.
Backend-specific timeouts. Some backends enforce their own request timeout independent of anything Terraform does. OpenTofu's AzureRM backend, for example, added a timeout_seconds option in 1.9 with a 300-second default; a large state read against a throttled storage account can exceed that before Terraform gets a chance to retry.
Provider API timeouts. These are separate from the resource-level timeouts {} block covered earlier. A provider's underlying HTTP client has its own connect and read timeout, and a slow or rate-limited cloud API can trip that before your resource's create or update timeout is ever reached. Raising max_retries and using retry_mode = "standard" (shown earlier in this guide) usually does more than lengthening resource-level timeouts.
CI/CD or platform run timeout. The most common cause in practice: the pipeline step has a shorter timeout than the run actually needs. GitHub Actions defaults jobs to a 6-hour ceiling, but plenty of teams set a much tighter per-step timeout that a large plan or apply runs past unnoticed, and the job gets killed mid-operation, sometimes leaving a stale state lock behind as a side effect. If you're running on a platform instead of raw CI, check its run timeout too. Scalr's default is 60 minutes per run, adjustable from 10 to 720 minutes per workspace, so a legitimately large apply doesn't get killed by a default sized for smaller infrastructure.
Terraform Rollback Strategies
Terraform doesn't keep a native "undo" history. A rollback is really a "roll forward" using an older configuration.
Git Revert Strategy (Primary Method)
The most reliable rollback approach keeps Git as your source of truth:
- Identify the stable commit: Locate the Git hash of the last successful deployment
- Revert changes: Run
git revert <commit_id>to create a new commit inverting breaking changes - Trigger CI: Push the revert to your branch, triggering your CI/CD pipeline
- Apply: Run
terraform planto verify the delta, thenterraform apply
This keeps Git history synchronized with actual infrastructure.
State File Restoration
If deployment fails severely and the state file is corrupted:
- Prerequisites: Enable versioning on remote backend (AWS S3, Azure Blob, GCS, Scalr, Terraform Cloud)
- Download previous state: Access your cloud storage and identify the pre-failure version
- Restore version: Set that version as current in the bucket
- Align code: Ensure local .tf files match the logic when that state was created
- Refresh: Run
terraform planto verify Terraform recognizes restored state
Warning: Manual state manipulation is risky. Use terraform state push only as an advanced user.
Blue-Green Deployments
Minimize rollback risk by running two identical environments:
- Blue environment: Your current stable production infrastructure
- Green environment: New version being deployed
Build Green from scratch, verify it fully, then switch traffic over with DNS or load balancer rules. If something goes wrong, you roll back instantly by pointing traffic back at Blue. Once Green is stable, decommission Blue with terraform destroy.
Architectural Safeguards
Limit Blast Radius: Avoid monolithic state files. Decouple infrastructure into smaller modules and separate workspaces so a failure in one stays contained instead of taking down resources that have nothing to do with it.
Protect Persistent Data: Use prevent_destroy = true on critical resources:
resource "aws_db_instance" "production" {
  lifecycle {
    prevent_destroy = true
  }
}
Enforce State Locking: Use remote backends supporting state locking (DynamoDB, GCP, Scalr, Terraform Cloud) and enable versioning for safety nets.
Validate with Testing: Integrate terraform test into CI/CD pipelines to verify expected resource attributes before touching real infrastructure. Complement with static analysis tools like Checkov or TFSec.
How Do You Optimize Terraform Performance at Scale?
For an in-depth look at running Terraform at scale across many teams and environments, see Terraform operations at scale. Concurrency tuning is a key lever, so read why Terraform concurrency matters for the trade-offs.
Understanding Performance Profiles
Terraform performance decreases based on resource count and state complexity:
- < 500 resources: 3-8 minutes (minimal optimization needed)
- 500-1,000 resources: 8-15 minutes (optimization recommended)
- 1,000-5,000 resources: 15-30 minutes (optimization critical)
- > 5,000 resources: 30+ minutes (architectural changes required)
Memory consumption scales at ~512MB per 1,000 resources, while plan time increases exponentially beyond 2,000 resources due to dependency graph complexity.
Before optimizing anything, measure where the time actually goes. In Scalr's support queue we regularly see runs reported as "taking 15 minutes" where 5-10 minutes is queue latency (the run waiting for a free runner slot) rather than execution. Teams hitting 10- or 60-concurrent-run caps end up queuing each other's work, and no amount of HCL tuning fixes a concurrency ceiling. In every one of those cases the fix was a support request, not an optimization: Scalr raises the concurrency limit on request at no extra cost. That is also why concurrency-based pricing is a poor fit for IaC platforms: when parallel slots are the pricing metric, every queue-latency incident turns into a procurement exercise.
Slow execution also has causes outside the graph. A team migrating off Terraform Cloud saw a GCP workspace of about 290 resources go from 4-minute to 30-minute runs after the move. Every run succeeded, just 15x slower. The silent ~28 minutes turned out to be the google-beta provider, pulled in by a project-factory module, repeatedly retrying authentication with backoff instead of failing fast against credentials that weren't wired up the same way in the new environment. Exporting the provider configuration as shell variables cut runs to under two minutes. When a run is slow but its plan output is unremarkable, check what the providers are doing during the quiet stretches before restructuring any code.
State Splitting: Foundation of Fast Operations
The optimization that matters most is splitting up your state file. Organizations report 70-90% reduction in operation times once they break a monolithic state into components:
Before: Monolithic state with 2,900 resources
terraform/
├── main.tf (all resources)
└── terraform.tfstate (300MB+)
After: Component-based splitting
terraform/
├── networking/
│   ├── main.tf (VPCs, subnets, security groups)
│   └── terraform.tfstate (15MB, 200 resources)
├── compute/
│   ├── main.tf (EC2 instances, ASGs, ELBs)
│   └── terraform.tfstate (25MB, 400 resources)
└── data/
    ├── main.tf (RDS, ElastiCache, S3)
    └── terraform.tfstate (20MB, 300 resources)
Use Terraform 1.1+ moved blocks to migrate without destroying and recreating resources:
moved {
  from = module.monolith.aws_vpc.main
  to   = aws_vpc.main
}
Parallelism and Resource Tuning
Calculate optimal parallelism with:
AVAILABLE_MEMORY_GB=16
CPU_CORES=8
PROVIDER_RATE_LIMIT=100

# Memory constraint
MAX_MEMORY_PARALLELISM=$((AVAILABLE_MEMORY_GB * 1024 / 512))

# CPU constraint (10 ops per remaining core, reserve 2 cores)
MAX_CPU_PARALLELISM=$(((CPU_CORES - 2) * 10))

# Provider constraint
MAX_PROVIDER_PARALLELISM=$((PROVIDER_RATE_LIMIT / 2))

# Use minimum of all constraints
OPTIMAL_PARALLELISM=$(echo "$MAX_MEMORY_PARALLELISM $MAX_CPU_PARALLELISM $MAX_PROVIDER_PARALLELISM" | tr ' ' '\n' | sort -n | head -1)

terraform plan -parallelism=$OPTIMAL_PARALLELISM
Module Architecture for Performance
Modules that stick to a single responsibility tend to run faster:
# Good: Focused module with clear boundaries
module "vpc" {
  source  = "terraform-aws-modules/vpc/aws"
  version = "5.0.0"

  name = "production-vpc"
  cidr = "172.16.0.0/16"
  azs  = data.aws_availability_zones.available.names
}

# Avoid: Overly complex module with 50+ variables managing everything
module "everything" {
  source = "./modules/kitchen-sink"
  # Results in 1000+ resources in single module
}
Composition patterns outperform inheritance:
# Enables parallel execution
module "base_network" {
  source = "./modules/network"
}

module "application_layer" {
  source = "./modules/application"
  vpc_id = module.base_network.vpc_id
}

module "data_layer" {
  source = "./modules/database"
  vpc_id = module.base_network.vpc_id
}
Optimization Impact Summary
| Technique | Impact | Complexity | When to Apply |
|---|---|---|---|
| State Splitting | 70-90% reduction | Medium | > 500 resources or > 50MB state |
| Parallelism Tuning | 30-50% improvement | Low | > 100 resources |
| Provider Optimization | 40-60% API call reduction | Low | All deployments |
| Module Architecture | 40-60% faster init | High | New projects or major refactors |
| Disable Refresh | 20-40% faster plans | Low | Known-stable infrastructure |
| Provider Caching | 90% faster initialization | Medium | All CI/CD pipelines |
| Resource Targeting | 85-95% scope reduction | Low | Emergency fixes only |
| Backend Optimization | 10-30% I/O improvement | Medium | Large state files |
Initialization deserves its own line item if you run Terragrunt. One Terragrunt shop found that terragrunt run --all spent 3.5 minutes of a 5-minute operation window on init alone, before a single resource was planned, on top of Aurora and OpenSearch applies that need 30+ minutes by themselves. Init cost scales with unit count, which is exactly the cost that provider and module caching attacks.
Terraform vs. OpenTofu: Where Each Engine Actually Got Faster
Both engines have shipped real performance work over the last two years, on different parts of the pipeline, so "is OpenTofu faster than Terraform" doesn't have a single answer:
- Terraform 1.10 (November 2024) reduced repeated decoding of resource state data during plan and apply, aimed at configurations evaluating a large number of resource instances.
- OpenTofu 1.9 shipped, in its own release notes, "several performance improvements for large graphs and large amounts of submodules," driven by community contributions rather than one headline feature.
- OpenTofu 1.12 made provider installation concurrent, so
tofu initfinishes faster on configurations pulling many providers, a real win on init time specifically rather than plan or apply.
None of these is the kind of benchmarked, double-digit speedup you can bank on for a specific configuration. They're targeted fixes for specific bottlenecks, which is exactly why state splitting and parallelism tuning above still matter more than which engine you pick. If you're choosing between Terraform and OpenTofu for performance reasons alone, architecture, meaning state size, dependency graph shape, and module structure, decides more than the binary.
Tricky Terraform Features to Watch For
1. for_each vs. count: Stability in Dynamic Resources
The Problem with count: When you remove an item from the middle of a list, all subsequent resources shift indices, causing unnecessary destruction and recreation.
Example with count:
variable "user_names_count" {
  type    = list(string)
  default = ["alice", "bob", "charlie"]
}

resource "aws_iam_user" "user_count" {
  count = length(var.user_names_count)
  name  = var.user_names_count[count.index]
}
If you remove "bob", aws_iam_user.user_count[1] (was "bob") now maps to "charlie", causing Terraform to recreate it.
The for_each Solution: Use stable key-based iteration:
variable "user_names_for_each" {
  type    = set(string)
  default = ["alice", "bob", "charlie"]
}

resource "aws_iam_user" "user_for_each" {
  for_each = var.user_names_for_each
  name     = each.key
}
Removing "bob" only targets that user for destruction. "alice" and "charlie" remain untouched.
Key Distinction:
- count: Index-based (0, 1, 2...) - prone to shifting problems
- for_each: Key-based - stable, resilient to reordering
Best Practice: Prefer for_each for non-trivial cases.
2. Dynamic Blocks: Reducing Repetition
Dynamic blocks generate nested blocks by looping over a collection, so you don't have to write the same HCL over and over:
variable "ingress_rules" {
  type = list(object({
    port        = number
    cidr_blocks = list(string)
    protocol    = string
  }))
  default = [
    { port = 80, cidr_blocks = ["0.0.0.0/0"], protocol = "tcp" },
    { port = 443, cidr_blocks = ["0.0.0.0/0"], protocol = "tcp" },
    { port = 22, cidr_blocks = ["10.0.0.0/16"], protocol = "tcp" },
  ]
}

resource "aws_security_group" "example" {
  name        = "example-sg"

  dynamic "ingress" {
    for_each = var.ingress_rules
    content {
      from_port   = ingress.value.port
      to_port     = ingress.value.port
      protocol    = ingress.value.protocol
      cidr_blocks = ingress.value.cidr_blocks
    }
  }
}
This is much cleaner than repeating ingress blocks manually.
3. Complex Expressions: Using Locals for Clarity
Break down complex expressions using locals to improve readability:
# Hard to read
tags = {
  Name = "app-${var.environment}-${var.app_name}-${var.is_primary_region ? "primary" : "secondary"}-${random_id.server.hex}"
}

# Clear with locals
locals {
  region_type      = var.is_primary_region ? "primary" : "secondary"
  base_name        = "app-${var.environment}-${var.app_name}"
  instance_name    = "${local.base_name}-${local.region_type}-${random_id.server.hex}"
}

tags = {
  Name = local.instance_name
}
Each part of the logic is now clearly named and easier to understand.
4. Module Design: Monolithic vs. Composable
Monolithic modules try to manage too many related pieces (VPCs, subnets, security groups, load balancers, databases all together). This leads to inflexibility, high complexity, wide blast radius, and poor testability.
Composable modules focus on single responsibility. Combine in root configuration:
module "vpc" {
  source = "./modules/vpc"
}

module "app_sg" {
  source = "./modules/security_group"
  vpc_id = module.vpc.vpc_id
}

module "database" {
  source = "./modules/rds"
  vpc_id = module.vpc.vpc_id
}
Benefits: Flexibility, simplicity, clear boundaries, reduced blast radius.
5. Locals vs. Variables: Understanding Purpose and Scope
Input Variables (variable blocks):
- Purpose: Parameterize configuration, allowing customization without changing code
- Scope: Values passed in from outside (CLI, .tfvars, environment variables)
- Analogy: Function arguments
variable "instance_type" {
  description = "The EC2 instance type"
  type        = string
  default     = "t3.micro"
}
Local Values (locals blocks):
- Purpose: Define intermediate expressions within a module
- Scope: Defined and used within the same configuration
- Analogy: Helper variables within a function
locals {
  common_tags = {
    Owner   = "DevTeam"
    Project = "WebApp"
  }
  instance_name = "app-server-${var.environment}"
}
Key Distinction: Variables are for inputs, locals are for internal calculations and DRY principles.
6. Workspaces: Appropriate Use Cases
Common Misconception: Using workspaces to manage dev/staging/prod from one codebase by varying inputs based on terraform.workspace. This becomes unmanageable with conditional logic littering your configuration.
Appropriate Use: Workspaces manage multiple instances of identical infrastructure differing only by input variables:
- Parallel development with separate state files
- Deploying same stack to multiple regions
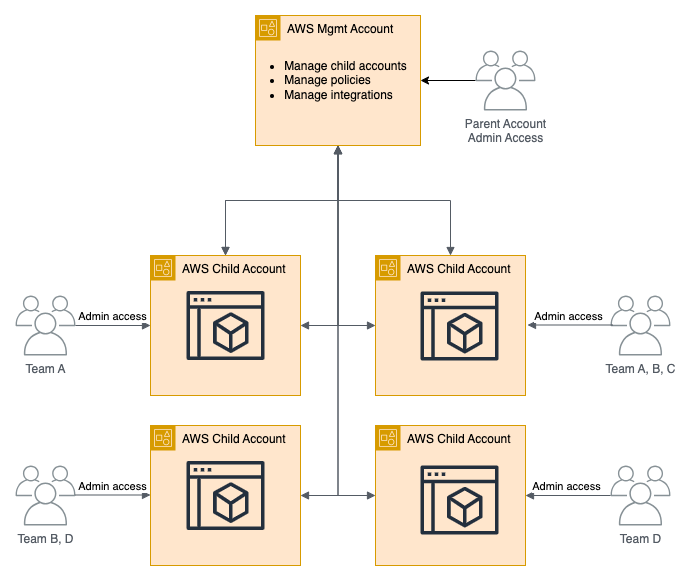
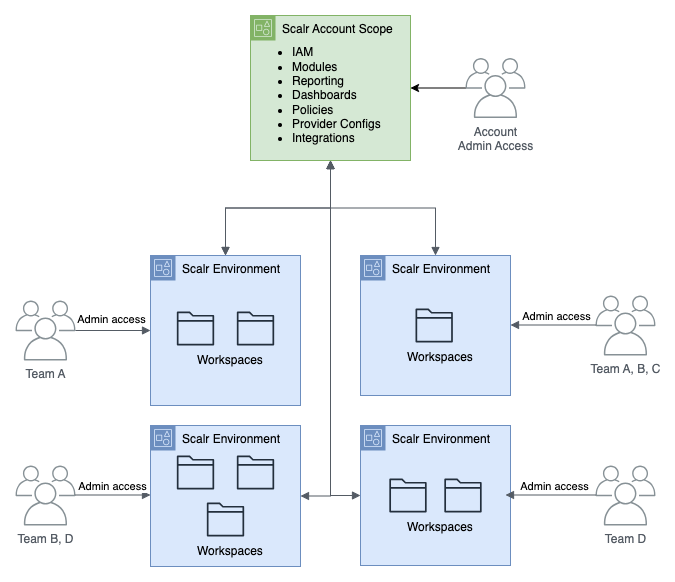
Better Approach for Environments: Use separate configuration directories or a platform hierarchy that maps environments to isolated scopes:
environments/
├── dev/
│   ├── main.tf
│   └── terraform.tfvars
├── staging/
│   ├── main.tf
│   └── terraform.tfvars
└── prod/
    ├── main.tf
    └── terraform.tfvars
modules/
└── my_app/
Each environment directory pulls in the common modules and passes its own variables.
What Are the Best Terraform Practices for 2026?
For the condensed version, see our top 5 best practices for Terraform. The list below expands on those plus more advanced practices:
- Use OIDC for CI/CD Authentication: Move away from static credentials. Implement OIDC in GitHub Actions, GitLab CI, and other platforms for keyless authentication.
- Enable State Locking and Versioning: Always use remote backends with locking (DynamoDB, GCP, Scalr, Terraform Cloud) and enable versioning for recovery.
- Implement Automated Testing: Integrate
terraform testandtftestinto CI/CD to verify configurations produce expected resource attributes before applying. - Monitor and Alert on Performance: Track plan duration, state file size, and memory consumption. Set up alerts when metrics exceed thresholds.
- Adopt Composable Module Design: Build focused modules with single responsibility. Share through registries (Terraform Registry, Scalr, or internal) for discoverability and versioning.
- Use Policy as Code: Implement OPA/Rego policies to enforce compliance, security, and cost constraints automatically.
- Plan for State Splitting Early: Don't wait until you hit performance walls. Architect with component-based state from the start.
- Document Troubleshooting Procedures: Create runbooks for common issues (InvalidClientTokenId, OOM, state locks) so teams can resolve them quickly.
- Embrace Infrastructure Testing: Use Checkov, TFSec, and other static analysis tools to catch security and configuration issues before deployment.
- Use Automation Platforms: Consider platforms like Scalr that provide enterprise features including workspace isolation, policy enforcement, cost estimation, and performance optimization built-in. Scalr bills per run, with no charges for users, workspaces, or resources under management.
Frequently asked questions
Why did terraform plan suddenly get slow without adding resources?
A common cause is a broad module-level depends_on. One team saw plans degrade from 8 to 40 minutes with a near-flat resource count because a single depends_on referencing whole modules gave every resource 1,347 dependencies in the plan walk, repeated across Terraform's three graph walks per run. Scoping depends_on to a specific output or resource fixes it. Slow runs can also come from provider retry loops or queue latency rather than the graph itself.What causes Terraform exit code 137 and out-of-memory errors?
Exit code 137 means the OS or container orchestrator killed Terraform for exceeding its memory limit. The usual drivers are provider schema loading (each provider instantiation is a separate process using hundreds of megabytes), dependency graph complexity amplified by broad depends_on and deep module nesting, and large monolithic state files. Fixes include consolidating provider blocks, pinning provider versions, scoping depends_on, reducing parallelism, and splitting state.Why doesn't TF_PLUGIN_CACHE_DIR work in CI or remote execution?
In remote execution the runner manages terraform init, so a TF_PLUGIN_CACHE_DIR set in your workspace or shell never reaches it. Caching has to be configured at the agent layer. On Scalr agents, that means SCALR_AGENT_CACHE_DIR and SCALR_AGENT_PROVIDER_CACHE_ENABLED with the cache directory on persistent storage.How do I roll back a failed Terraform deployment?
Terraform has no native undo; a rollback is a roll-forward using a previous configuration. The primary method is git revert of the breaking commit followed by plan and apply through your normal pipeline. If the state file itself is corrupted, restore a previous version from a versioned remote backend, align your code to that point, and verify with terraform plan.When should I split a Terraform state file?
Once a configuration passes roughly 500 resources or the state file exceeds 50MB. State splitting into component stacks (networking, compute, data) delivers 70-90% reductions in operation times, and Terraform 1.1+ moved blocks let you migrate resources without destroying and recreating them.How do I fix the InvalidClientTokenId error in Terraform?
Clear conflicting AWS environment variables, regenerate credentials if the secret key contains special characters like + or /, verify with aws sts get-caller-identity, and add the session token if you are using temporary credentials. About 40% of cases trace to special characters in credentials and 25% to missing session tokens.Why does terraform plan or apply time out?
A timeout can come from four different places: the state lock wait controlled by -lock-timeout (0 seconds, meaning fail immediately, unless you set it), a backend's own request timeout (for example OpenTofu's AzureRM backend timeout_seconds option, default 300 seconds), a provider's underlying API client timing out separately from a resource's timeouts block, or the CI/CD job or platform run timeout killing the process mid-operation before Terraform itself would have failed. Check which layer is actually timing out before tuning any single one of them.Is OpenTofu faster than Terraform?
Not in a way that generalizes. Terraform 1.10 reduced repeated resource-state decoding during plan and apply. OpenTofu 1.9 improved handling of large graphs and submodules, and OpenTofu 1.12 made provider installation concurrent for faster init. Each targets a different bottleneck, so the engine you run matters less than your state size, dependency graph shape, and whether you've split a monolithic state into smaller stacks.